Snow on the Sand - A Guide to TCB Zheng
Author: shep (@hyponumangel on discord)
Editor: Majin Evelyn
Table of contents
- Preamble
- Introduction
- Terminology
- Diagrams
- Crashing Antarctic (Frame Overview)
- Breaker of Land (License Gear Overview)
- Killing Intention (Strategy)
- Sword in the Hand (Core Bonuses and Talents)
- Body Unbroken (Build Progression)
Preamble
“hoagiefest zheng probably agimaxxes”
“gougarframe mid, go 2204 reinforced”
“defender zheng zased”
“reliable 7 triplemount unclehammer jombined arms”
“sequence onhits kb2 to disable pds, then deal damage”
What the fuck is up with Zheng, anyways? And why do some of the people who play it speak in tongues when discussing the frame?
Introduction
Hi! I’m shep (she/they), and I am normal about Lancer. I can’t help you with the previous question- but I can help you with playing the Zheng- specifically a variation of TCB Zheng I call ‘Snow on the Sand.’ This guide is about that build- a formidable melee dive-striker that’s a great addition to any team that needs burst damage and frontline presence. For some context, I have almost 200 hours playing the Zheng (estimated), a large portion of which has been spent playing the TCB variant, across the Hearth-7 Westmarch, house-games, pickup games online, etc. This guide covers terminology, the frame, equipment and strategies first before diving into an example corebook respec-compliant build. The last section contains variant builds for LL6, LL9 and LL12.
Art Credits: Snow on the Sand by shep (@hyponumangel) - bsky, includes Retrograde Minis assets
Terminology
Ablative: Refers to a cheap, low cost system/weapon that can be destroyed in the event of System Trauma without significantly impacting the build.
AP: Armor Piercing (tag)
ATMS: All-Theatre Movement Suite (Core Bonus)
Autostab: Auto-Stabilizing Hardpoints (Core Bonus)
Backswing Bounce: A tech-option using No Escape after missing an attack to reroll an attack into a nearby terrain-piece, then using Backswing Cut to strike the initial target. Ask your GM about this.
Backswing Lunge: A trick that uses Hunter 1 and an Integrated Auxillary Melee of your choice to leap 3 spaces before using Backswing Cut to extend the range.
Blinkspector: Blink Charge+Prospector, a combination of system and talent that add a great deal of mobility to both the build that runs them and the team they run alongside.
Bulk: A term that roughly summarizes the overall durability of a mech by weighting HP, Armor, Evasion and (to a lesser extent) E-Defense, as well as defensive features it might have access to.
DPR: Damage Per Round
DSAS: Decksweeper Automatic Shotgun.
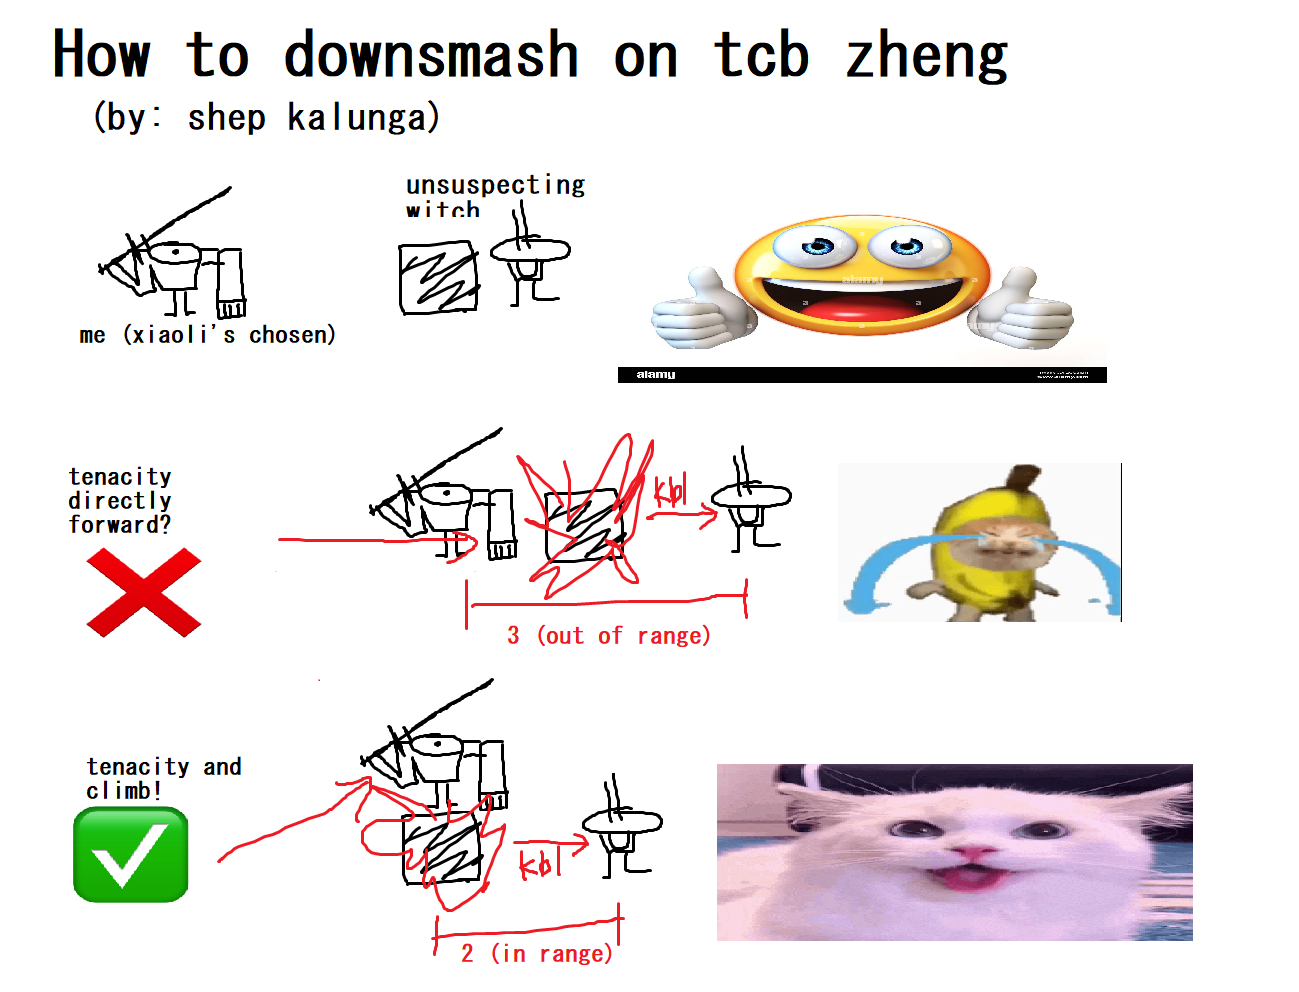
Downsmash: A usage of Xiaoli’s Tenacity to strike and destroy an object beneath you. Typically useful for repositioning enemies.
FA1: Field Analyst 1 (Talent)
FFP: Flickerfield Projector (Dusk Wing 2)
FRG: Fuel Rod Gun (Nuclear Cavalier 3)
FSS: Full Subjectivity Sync (Core Bonus)
Flanchor/FLock: Flash Anchor (Saladin 2)
GM X (usually 2 or 3): Grease Monkey (Talent)
Gougar/Gougarframe: Gyges Frame (Core Bonus)
HASE: Hull-Agility-Systems-Engineering, usually denoted as numbers respectively. (ex: 2204)
HFC/HCS: Heatfall Coolant System (Core Bonus)
Hoagiefest: Any mention of Wawa Hoagiefest refers to a flying Zheng build, usually with core-active to achieve a “chainboosting”-like effect. This occurs because flight requires you to move in straight lines for individual movements- and while core is up, each instance of Xiaoli’s Tenacity is a separate instance of movement, allowing you to jet around the map in zig-zags in a method resembling chainboosting from the Armored Core series.
JK1/2: Jager Kunst I and II (Atlas 2 and 3)
Jailgun: Jager Rounds (Walking Armory 2) + Impaler Nailgun (Vlad 2)
Kalunga: Kalunga
KBP: Kai Bioplating (Core Bonus)
Kb X: Knockback X, where X is a number.
Nuccav: Nuclear Cavalier (Talent)
OC: Overcharge
One-Cycle: A striker term meaning to wreck an NPC/take an NPC from 100-0 within one turn’s worth of actions. (like an OHKO, but not strictly one hit)
Opcal: Overpower Caliber (Core Bonus)
PDS: Point-Defense Shield (Cataphract Base System)
Pank X (usually 2): Pankrati 2, referring to the first 2 ranks of the Pankrati Talent.
Prosp X (usually 1 or 3): Prospector (talent)
RSU: Redundant Systems Upgrade (Sherman 2)
Refframe: Reinforced Frame (Core Bonus)
SBD: Superior By Design (Core Bonus)
TCB: Tempest Charged Blade, the namesake weapon of the build.
TSS1: Total Strength Suite I (Zheng 1)
Tipper: Knockback sequencing with damage. Effects that deal both knockback and damage are usually able to resolve knockback and damage in either order (page reference here), allowing you to circumvent proximity-based resistance (Cataphract’s Point-Defense Shield, Avenger’s Assault Armor, MBT’s Composite Armor) by dealing Knockback first, then damage after the resistance is no longer active. Named
Uppercut: A usage of Xiaoli’s Tenacity to strike and destroy an object beneath an enemy.
Vg X (usually 3): Vanguard 3, referring to all 3 ranks of the Vanguard Talent.
WAC: Wide-Arc Cleave, rank 2 of the Executioner Talent.
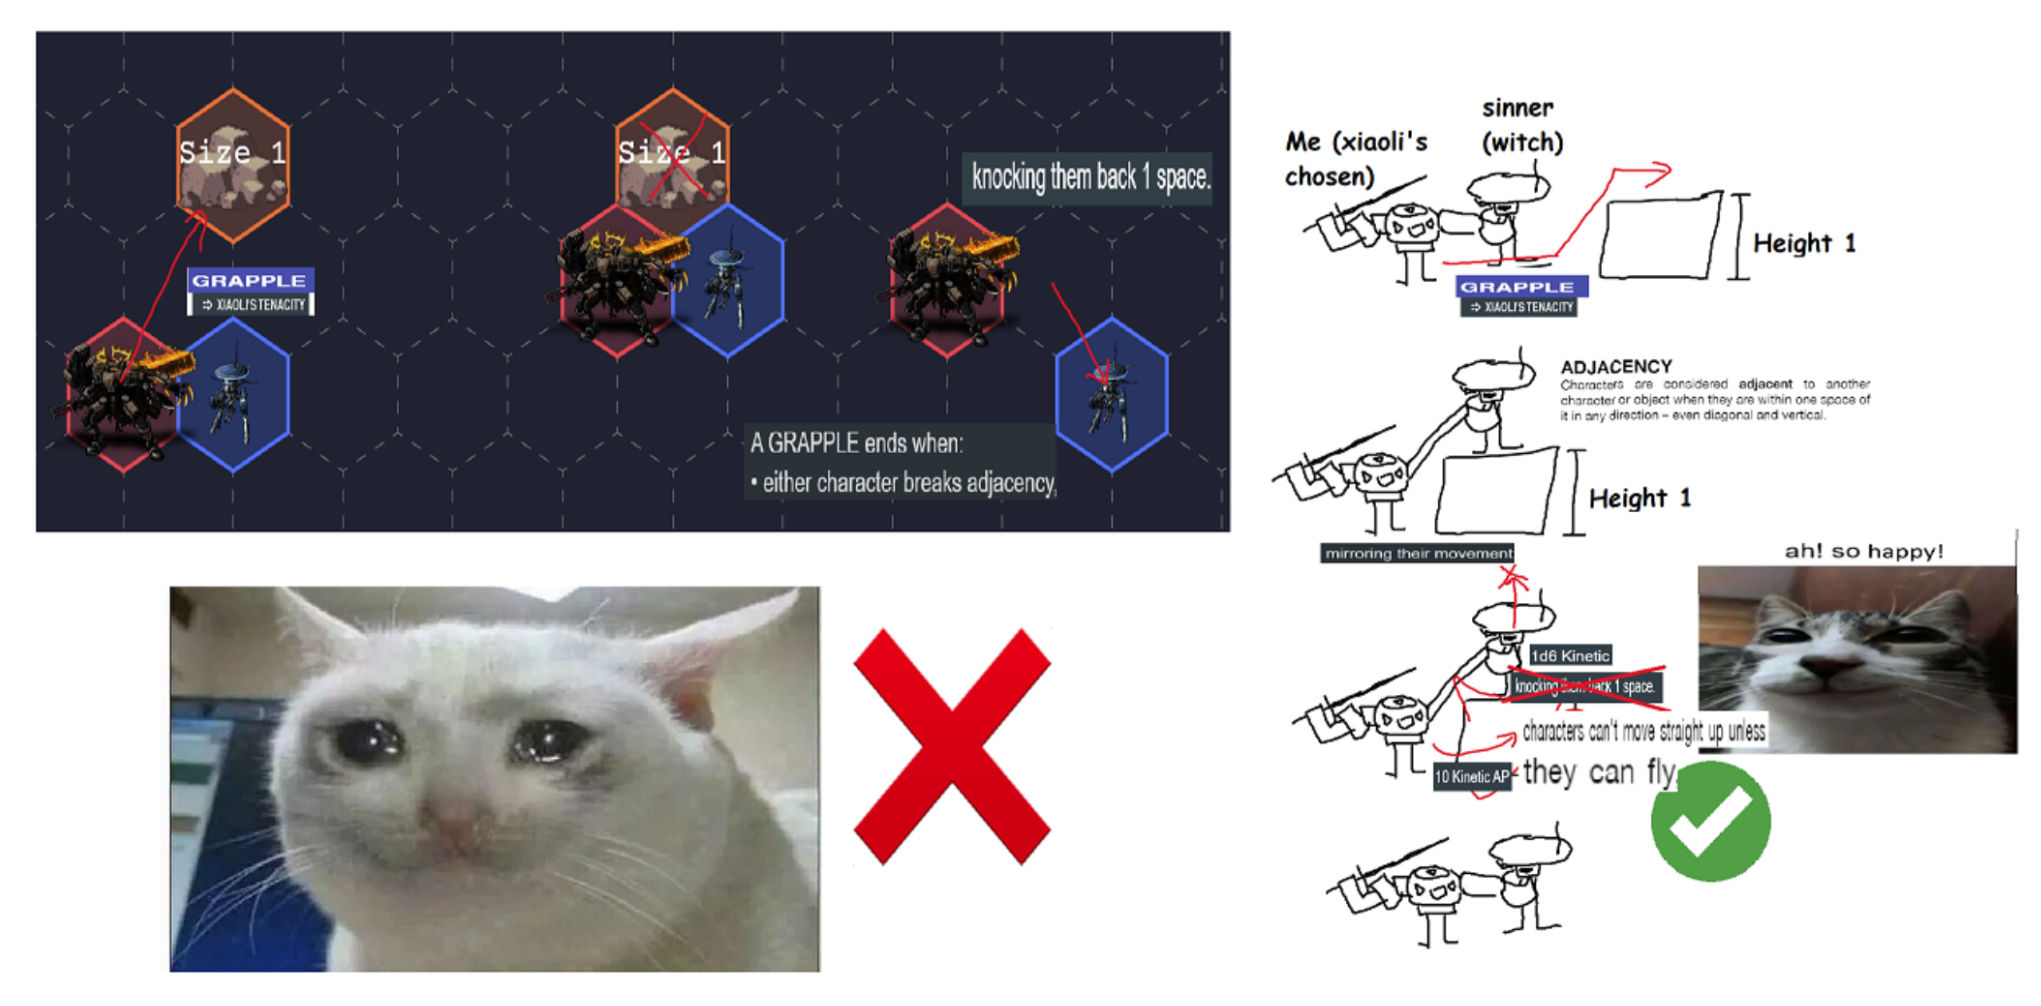
Xiaolijuggle: Using the knockback of Xiaoli’s Tenacity to knock an enemy adjacent to another destructible piece of terrain.
eHP: Effective HP.
Diagrams
Crashing Antarctic (Frame Overview)
Stats
The Zheng is an exceptionally well-statted frame for its purpose as a striker. It spares no budget for stats and is nestled cleanly in IPS-N to pick up Reinforced Frame to further improve its bulk. Lackluster tech/controller stats, but you weren’t taking those actions anyways (unless…). Notable stats are as follows.
- 10 HP / 2 Armor: Spectacular durability, even for an IPS-N frame. Allows you to comfortably invest in Agility for speed without compromising durability, especially with Reinforced Frame.
- 9 Evasion: Above average Evasion that becomes more relevant when cover is factored in. Even a little bit of Agility goes a long way.
- 3 Speed: This is a fake number. This represents half of the Zheng’s speed- it makes Boosting and Pankrati 2 much weaker on this frame as a result. Note that you don’t lose movement to engagement until you start spending it, so using this after becoming engaged from Xiaoli’s Tenacity movement can still be done!
- 6 Repair Cap: The highest base repcap of any frame that isn’t Lancaster, tied with Tortuga. Allows you to get away with lower Hull investment.
- Main-Main-Heavy Mount: Adequate mounting for most striker purposes, though auxiliary weapons are troublesome outside of core bonuses.
Traits
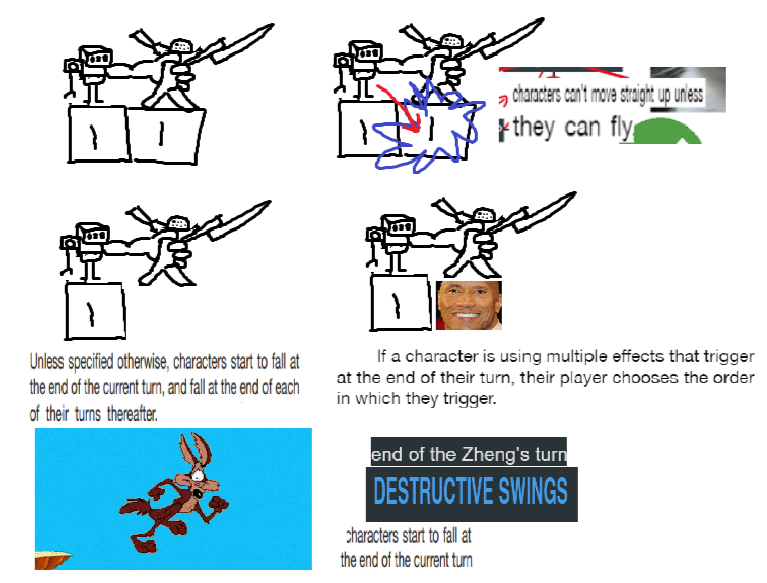
DESTRUCTIVE SWINGS: At the end of the Zheng’s turn, if it made at least one melee attack against a hostile character, the force of its swings creates a SIZE 1 piece of terrain that grants hard cover in a free, adjacent space. It has 10 HP and EVASION 5.
- Destructive Swings is a potent frame-trait that encourages it to make, well, melee attacks. The easiest way to use this is to plant it between yourself and ranged enemies to generate Hard Cover, but it can also be used to block out chokepoints and enable its core passive.
WEAK COMPUTER: The Zheng takes +1 Difficulty on all systems saves and checks.
- Not much to say here other than the fact that it’s inconvenient if/when it comes up. Don’t bother with trying to shore up your systems- instead, try positioning such that the actions that prompt you to roll these can’t target you.
Core Passive
Xiaoli’s Tenacity: 1/turn as a free action, you may move up to 3 spaces then deal 2 Kinetic to any adjacent character or 10 Kinetic AP to an object or piece of terrain. This movement prompts engagement and does not ignore reactions. If this damage destroys an object or piece of terrain, it explodes, dealing 1d6 Kinetic to all adjacent characters other than you and knocking them back 1 space.
Xiaoli’s Tenacity is an extremely potent tool that sets Zheng apart and defines its playstyle. Serving as Zheng’s source of mobility, deterministic damage and (slight) control, Xiaoli’s Tenacity is a fantastic tool for a variety of situations. Note that, as written, the knockback is not optional, so divers should be wary of knocking enemies out of the threat/range. Xiaoli’s Tenacity can’t be ‘banked’ like Boost movement and doesn’t ignore Reactions or Engagement, so it’s typically best used as the last movement to close on a target and get a bit of chip damage on the way in. Tenacity can be used while Jammed, so make use of this fact during recovery turns to continue to chip away. Xiaoli’s Tenacity is, however, a source of movement for Flight and Climbing, allowing you to maneuver a map and play objectives. Being Slowed and Immobilized (as written, ask your GM) doesn’t stop you from using this action, either- you can’t move, you just get the subsequent damage. There’s a lot of depth to this passive, oddly enough. Did you know that wrecks count as objects? Yeah, they do, with HP equal to their size x10. Make use of this as you will, though the ethics of punching wrecks might raise some eyebrows… below are diagrams of weird Tenacity tricks. The second one is a little less relevant given that grapples are less prevalent on TCB Zheng.
Core Active
Xiaoli’s Ingenuity: For the rest of the scene, this system gains 6 charges (you can use a die to track this). Expend a charge to use XIAOLI’S TENACITY again, ignoring the 1/Turn limit. You may spend any number of charges a turn. At the end of each turn, you regain a charge for each unique target (character, object, or piece of terrain) you damaged with this action, to a maximum of 6.
Thank you, based Xiaoli. Zheng’s core active is obnoxiously strong, turning the effective Speed 6 frame into a Speed 24 frame. This allows you to circumvent mobility-denial reactions by giving up one of your 8 possible instances of movement. Note that dealing damage by ‘rock explosion’ will refund at least 2 charges, allowing you to strike the same target multiple times losslessly, if needed. An effective strategy to nova a single target down is Tenacity the target for 2, then an adjacent rock for 1d6. This has, in total, gone “neutral” in Ingenuity charges, allowing you to power out chip damage without much effort. If you hit another target with the rock explosion, you can tap the original target again for another 2. It’s ok to go negative on Tenacity charges on some turns if necessary- you can regain them quickly by hitting with the rock explosions. Tips for use include using your standard move to bridge the gap between unique objects. Tenacity is a potent feign-death checker- Ingenuity makes it practically free.
Breaker of Land (License Gear Overview)

GMS
- Tempest Charged Blade: Ralf Ziegler’s gift to melee strikers. Sporting a staggering base Threat of 2, a massive 3d6+4 Energy damage profile, the AP tag AND Knockback 2, the TCB is a formidable weapon that you should typically be aiming to swing as much as possible. It almost immediately gets autostabbed- it has no shortage of damage, it merely needs to hit. Knockback 2 allows you to break pesky grapples, clear zones and perform “Tippers”. Apparantly, TCB is also an anti-tank sword- the knockback 2 can turn the armored face of an MBT away from you before dealing damage.
- Shotgun: While powercrept hard by DSAS, the honorable GMS Shotgun is a functional weapon. You can use it.
- Armament Redundancy: TCB Zheng has 2 weapons, the TCB and a CQB of choice- and it wants both of them. Simple as.
- Personalizations: Generic +2 HP system. Generally worth it over the other 1 SP GMS systems. You can give your mech a fridge or something, too!
- Projected Shield: Useful for self-heat, as well as deliberately trying to miss a target for Backswing into No Escape. Doesn’t protect you from tech-attacks, but can be useful.
- Type-I Flight System: For the cost of 2 heat a round, you can fly. This functionally makes you immune to Prone and difficult terrain, and allows you to jet around the map. Heat generation is useful for nuccav- but risky because of your 6 E-Defense makes you vulnerable to chump invades.
- EVA Module: Mostly an ablative, EVA Module sometimes comes up outside of space or water with GMs ruling it as allowing you to cross a river or something similar unhindered.
- CPJ: Custom Paintjob is funny. Whether it’s “good” is entirely dependent on your luck- but a CPJ trigger is rarely an uninteresting occasion.
IPS-N
Nelson License
- Bulwark Mods: Cheap, effective and useful as an ablative. As a melee striker, mobility is necessary! Consider picking this up.
- Thermal Charges: Limited 3, +1d6 Bonus Damage on a melee weapon. Goes on the TCB and gets used to rip through heavier targets.
Tortuga License
- Decksweeper Automatic Shotgun: Threat 3, Range 3, 2d6 Kinetic. Inaccurate is cancelled out by Vanguard 1, and proves to be an excellent threat to hold up off-turn with Vanguard 3. Do try to avoid Engagement while using this.
-
Vlad License
- Impaler Nailgun: An alternate weapon to DSAS, Nailgun offers heat-generation and an Immobilize on-hit to armbar pesky melee NPCs- though Zheng’s lackluster save target and poor e-defense make it a little riskier to use. Heat fuels Nuccav, though, so it’s worth considering.
Caliban License
- Supermassive Mod: A cheap mod that can be tossed onto your CQB or your TCB. The heat from Overkill is risky- but the Knockback can prove to be useful, especially with Vanguard 3’s ability to interrupt a turn.
Zheng License
- Total Strength Suite I: Throw a rock. As amusing as it is, TSS1 is a powerful system that allows you to deal kb1, 1d6 and place a rock anywhere adjacent to the person you just threw the rock at. This allows you to subsequently Tenacity that rock for free damage. Great for granular repositioning and always a fun system to use. Did you know that it doesn’t have the Unique tag? You can run 2 of them- activating each of them individually doesn’t count as duplicating actions. Solid action to use while Jammed or while dealing with targets that have features that would make attacks automatically miss.
- Molten Wreathe: Put simply- diet thermal charges. As it is omnidirectional, making use of the TCB’s Kb2 to place the target into an opportune place before directing the cone into less armored targets. Outpaced by Thermal Charges- but still a useful source of extra damage early on. Note that it happens in a separate instance- so it’s effected by armor and doesn’t deal damage to anything with 2 or more armor (including yourself!)
- The Frame: The Frame is here. You kinda need to take it.
SSC
Dusk Wing License
- Flickerfield Projector: Free invis, 1/round. Low cost. Try keeping a little reminder on your screen while using it- a lot of people forget if/when they have FFP.
- Stuncrown: As a diver, Zheng positions to catch multiple people in Backswing Cut range (threat 2)- which also conveniently places it in a space to use Stuncrown to Impair and Jam nearby foes. Sequencing the Systems Save for Impair to happen BEFORE the Agility save for Jam is generally the correct way to go about using this system.
Mourning Cloak License
- Singularity Motivator: 1/round teleport when you get hit. Useful for dodging multi-attacks at higher tiers and especially useful with a Sunzi ally- but otherwise a bit underwhelming.
Swallowtail License
- Lotus Projector: A drone that strips invisibility. Useful for when you encounter invisible enemies- overcharge to deploy and barrage with the TCB. Note that you can then do a cheeky Backswing into the drone- as it’s invisible, if you lose the coinflip, you can reroll the Backswing into the main target.
Atlas License
- Jager Kunst I: Richochet off Size 2 and bigger objects. Situationally useful, but generally not necessary. If you can somehow get your Zheng to be a Size 1/2 mech, this system becomes incredibly busted. For ethical reasons, I do not endorse any method to make a Zheng size 1/2.
- Jager Kunst II: A neat system that allows you to challenge someone to a stat-check duel. Winning it nets you some damage, knockback and movement- movement that you can specifically use to extend backswing cut angles. Overcosted and requires you to focus one of your stats (Hull: Gyges, Agi: ATMS Ace 1/Kai Bioplating) as well as wanting Spaceborn 3 (Talent)- it’s more a “cool” option than an optimal one.
HORUS
Balor License
- Nanocomposite Adaptation: Not recommended. You can make your CQB and/or your TCB Smart and Seeking. Generally not useful and super overcosted, but technically an ok option if you expect to see lots of Hornets. Generally, the Accuracy granted by autostab is enough to push through.
HARRISON ARMORY
Saladin License
- Flash Anchor: Flash Anchor is comedically cheap- costing you 1 SP, 2 Heat and no actions taken on-turn to completely nullify knockback, pushes and pulls on yourself or a very, very close-by ally. Allows you to dive into control zones and sit there, immovable. Did you know it also gives immunity to the things it prevents in the first place, too?
- Paracausal Mod: Obliterate that twink! By tossing 3 LLs into the Saladin License, you can pick up a SP-hungry mod that makes the TCB irreducible. No more worries about Point Defense Shield, Capacitor Discharge, Hunker Down, Squads, Ablative Plating, etc, etc. Long list of Resistances that you can elect to simply ignore.
Napoleon License
- Blinkshield: This is not a “good” system on TCB Zheng- that is to say, using it here isn’t anything unique. It’s a full action that creates an impenetrable dome around you, completely locking down a sector of the map. Useful both as a zone lock-out or as a thunderdome. Use your superior mobility to plant it down where you want it and watch the GM try to interact with it (they can’t).
Sherman License
- RSU: Stabilize as a Quick. Arguably one of the best selfish systems in the game, TCB Zheng is no exception to Shermanization. Overcharging to RSU to clear a condition allows you to keep swinging the TCB even if you get Jammed or Immobilized.
Sunzi License
- Blink Charge: Blink Charge, specifically Warp Grenade, is an extremely potent positioning tool. Covering a staggering Blast 3, word of Tom says it effects all chararacters in the zone, allowing you to move yourself, allies and enemies into optimal positions for sitrep play, backswing and tenacity angles, etc, etc. The mine is somewhat mediocre on Zheng but still technically usable.
- Blinkspace Tunneler: Blink Charge’s smaller brother, Tunneler allows you to lay down a portal for allies to follow you- useful for if you decide to dive to where allies are otherwise unable to reach you.
Killing Intention (Strategy)
silly meme by @euroliis on discord
So, how do you play this build? It’s easy to say “dive,” but how do you dive without eating shit?
Play with your Team!
You are not alone. You have a team. Make sure that when you make plays, your team can follow up- and make sure that you can follow up to your teammates plays too.
Play Smart
TCB Zheng, like most strikers, preys on NPCs that it can kill quickly- bursting them down quickly with Tenacity and TCB. Tenacity is best used on “soft” targets- NPCs with low armor, and the TCB best used on “hard” targets- NPCs with high armor. Generally, you want to waste as little damage as possible- if something’s on low HP, try killing it with the half-damage backswing cut and/or tenacity- reserve the “main” full damage swing for something that will take all of it.
The Art of Eating Shit
You are expected to draw aggression. A mech with a giant sword punching holes in walls and throwing rocks does that. Make choices that make it difficult to punish you for your play- as you draw aggression, your allies are more able to carry out their gameplans. Sometimes, it’s ok to sit and face-tank for your team- but also remember that sometimes when your allies eat shit, you should use your moment, too.
Target Priority
Though it will depend on the game, you will generally want to hunt down NPCs that will give you and your team trouble- but that you can kill effectively- Zheng particularly dislikes tech-attackers that can exploit its awful e-defense and controllers that slow or immobilize it. Spites, Barricades, Witches, Hives, Scouts and Seeders are a few examples of nasty NPCs that Zheng dislikes. TCB Zheng is uniquely built to take on Cataphracts, Avengers and MBTs because of TCB’s ability to tipper. Here’s a quick overview of all official NPCs and some general strategies.
- Tempest: Smash nodes with Tenacity and see if you can get close to TCB the Tempest itself (climb on top of terrain). Cover your allies who can hit the Tempest more readily, and make sure that you avoid getting hit with the Monsoon Nanite Dispensers, as it can Slow you.
- Leech: Extremely low base HP. Kill with tenacities and wide arc cleaves, but don’t be afraid to backswing into it. Overwatch them when they step up.
- Avenger: TIPPER! Kill on sight- a priority target that becomes enraged if you kill its allies. Their resistance to damage within Range 3 can be easily disabled if you hit them with the TCB at Threat 2, as the knockback places them at range 4. Overwatch them when they step up.
- Lurker: Troublesome to position around in their cloud and invisible, as long as you can either tipper them out of the cloud or knock them out with tenacity, you can tear them apart with the TCB. Be wary of their weapon’s threat, but their relatively poor to-hit bonus means they’re likely to miss.
- Strider: Extremely squishy. Hard to get to, but dies on impact. Weapons and features can be annoying, though Jamming Pylon explodes to tenacity. Be wary of Skirmisher Kit’s Explosive Rifle, as it does have Threat 3.
- Spite: System save hell. Between Imprison, Seize, Crush Targeting and otherwise, Spites prey on your weak computer and simple game-plan from a distance. Try to break line of sight as much as possible, and kill it when convenient- even with AP, spites are difficult to one cycle because of their high base HP.
- Ace: Generally hard to interact with because they fly- Barrel Roll can cause the Tempest Charged Blade to automatically miss. Troublesome, and likely should be left to allies.
- Aegis: A slow, plodding pillowfort-style NPC. Bumrush them with caution- but they’re relatively easy to kill.
- Archer: Annoying- but crumples quickly when attacked, as they have no Armor to protect them from Xiaoli’s Tenacity. Make use of cover and try not to get locked down- you’re usually bulky enough to eat their attacks.
- Assassin: Evasive, fast and dangerous. Not sturdy enough to take a TCB hit, usually, but very dangerous in melee. Be wary of their optional shotgun- but its poor to-hit bonus and your above average evasion make it an acceptable gamble. Overwatch them when they step up.
- Assault: Sturdy and somewhat troublesome. Hunker Down allows them to take a TCB hit or two, and their damage can be threatening especially if they have the AP optional.
- Barricade: Public Zheng Enemy Number 1. Bulky and extremely annoying. With a good systems bonus for fragsigs, a weapon that slows on hit and optionals that can immobilize, slow and punish movement, a Barricade is your nightmare. Avoid line of sight and try to get where you need to go before they stop you.
- Bastion: All armor, no HP. Bastions are liable to dying to a highroll of backswing but basically take no damage from tenacity. Be very wary of Deathcounter and their ally-interdicting effects- though you should be able to one shot them.
- Berserker: Quick and dangerous. Berserkers can shred, hit hard and move fast- you might have to devote an overcharge to disabling their resistance with a Ram or a cheeky -2 fragment signal (they have a terrible e-defense). Tippering a Berserker can knock it into an ally for friendly fire-aggression. Overwatch them when they step up- but usually they’ll avalanche charge in.
- Bombard: Scary if they hit, but somewhat inaccurate. Close the distance and drop them quick if they’re giving your team trouble.
- Breacher: Terrible accuracy but scary if they hit. Sturdy but not sturdy enough, Breachers die to a solid Tenacity+TCB roll. Overwatch them when they step up.
- Cataphract: Fast but not particularly dangerous. Much more troublesome if they have Capacitor Discharge, but otherwise Tipper them into allies to disable their resistance- you can usually one cycle them with this. Overwatch them when they step up.
- Demolisher: Slow but extremely hard to kill. Resists almost everything you do to them and can’t be knocked around. They’re liable to missing- but they are dangerous nonetheless.
- Engineer: Not super dangerous- turrets deal damage in a bunch of instances, which armor keeps you nicely shielded with. Killable.
- Goliath: Big and heavy. Vulnerable to tenacity, but hard to kill. Be wary of immobilization, jams and Crush Targeting. Killable.
- Hive: Extremely annoying. Can push you around or immobilize you, as well as throw you through burn zones. Kill them! Dies to a solid Tenacity+TCB roll.
- Hornet: If you can hit it, it dies. The trouble is hitting a flying, high evasion goober whizzing around over your head. Be wary of Jam and Immobilize. Kill if you can- but difficult to kill because of their exceptionally high evasion. Don’t overwatch them when they step up- they have Weave!
- Mirage: Squishy but scary. Teleports its allies around and is hard to hit, as well as having optionals to possibly deny your positioning and attacks. Vulnerable to having many rocks thrown at it.
- Operator: Terrifying damage but not so scary up close. Difficult to close in on, but once you do- you can one cycle them.
- Priest: Annoying tech attacker but exceptionally flimsy. Dies to WAC+Tenacity+Backswing, and is usually in a position to eat these because it’s close to allies.
- Pyro: Slow, threatening damage but crumples like a tin can to AP. You can one cycle a pyro with the TCB- though Tenacity won’t deal much damage.
- Rainmaker: Only scary if you’re getting Lock On or Shredded. Gains AP and Smart against targets with lock- though your armor mitigates much of the effect of the Javelins. Worth hunting down, one cyclable with tenacity+tcb.
- Ronin: Scary burst multiattacker, but fightable. Hit it with the TCB and kill it. Overwatch them when they step up.
- Scourer: Troublesome meatball. Try not to get targeted- they resist your main damage and eating their focused damage is not sustainable. Be wary of their optionals, too.
- Scout: Squishy but scary. Dies to tenacity- but can Shred you and make you much more vulnerable to damage.
- Seeder: Threatening. You have negative systems- so try to avoid their mine zones altogether. Avoid LOS.
- Sentinel: Somewhat threatening. Threat 3 and a slew of control optionals allows them to cripple you if you’re too enthusiastic- but they’re still vulnerable to getting bursted down.
- Sniper: Scary! Big AP gun that almost never misses. Deal with them when you can- don’t be afraid to give up movement to deny their reloads.
- Specter: Hard to hit but dies to tenacity. Be very wary of their burst especially at higher tiers. You basically can’t find them after they prowl (shit action economy + weak computer), so it’s better if an ally kills them.
- Support: Be wary of sealant gun- kill their allies first, though.
- Witch: Packs a whole slew of tech attacks to ruin your day. Seek and destroy, they are not durable enough to withstand the TCB. Avoid Line of Sight.
- Squad: Somewhat tricky to deal with. Be wary of the AP weapon. Not exceptionally threatening.
Positioning
Placing yourself in the correct position to exploit Destructive Swings and Xiaoli’s Tenacity is important. Make sure you’re able to access at least 2 targets for Backswing Cut, and make sure you’re close enough for your CQB’s threat to sit near or on NPCs that will want to move (and thus, trigger your overwatch). Use Destructive Swings to plant a rock to use as cover- or adjacent to an enemy nearby to pressure them by threatening the next turn’s Tenacity on them. Break line of sight with tech attackers and controllers as much as possible.
Sword in the Hand (Core Bonuses and Talents)
Core Bonuses
GMS:
- Auto-Stabilizing Hardpoints: This is the #1 core bonus and is basically required. Take this as early as possible (LL3). Bumps up chance to hit sizably and improves crit-chance, which becomes relevant with the large damage dice count and WAC.
- Overpower Caliber: Adds +1d6 1/round to the TCB. Solid choice, but not exceptional.
- Integrated Weapon: Tape on a tacknife or another aux melee of choice to Backswing Lunge. Stylish and functional!
IPS-N
- Reinforced Frame: +5 HP represents approximately +2.5 Hull worth of HP, which means you can take some points out of hull and put it into Agi or Engi. 2 hull + Reinforced Frame puts you at comfortable bulk for LL6. Recommended core bonus.
- Sloped Plating: +1 Armor is conditionally useful. Great if you’re eating many instances of damage that isn’t AP. Only beats Reinforced frame if you take 6 or more instances of non-AP damage per-structure. Oh, and if you don’t get shredded.
- Gyges Frame: Gougar! +1 Threat for the TCB markedly increases Backswing positions, and +1 hull allows you to play a little bit more riskily around save or suck effects.
SSC
- ATMS: Costing less heat and less SP than GMS Type-1, ATMS is the signature second core bonus of “Hoagiefest” Zheng. Dip Ace 1 with flight for free accuracy on agility and a neat little repositioning reaction.
- FSS: +2 Evasion is useful on a frame with higher than average evasion, though it’s only a marginal benefit unless you have a lot of agility already. Neat pick.
- KBP: Accuracy on Agility checks for presumably JK2 and the ability to run on walls. Mobility is useful on Zheng, but KBP is a little overcosted. Neat if you want to have cool jumps, but definitely worse than ATMS.
HA
- SBD: +2 heatcap and immunity to impair. Ensures that the TCB swings at +1 at almost all times and gives you extra heat to pad your horrible e-defense with. Recommended core bonus.
- HCS: Never reach the giant overcharge die. Works for OC hungry players who want to take an extra quick often- though TCB is generally enough and overcharging is usually only an urgent option.
Talents
Core Talents
These talents are what I consider to be absolutely necessary for the build.
- Vanguard 3: You can’t overwatch with a superheavy, and you can’t shoot your third mount without overcharging most of the time. What you do instead is simple: mount a main CQB of your choice on the third mount and use Vanguard 3 to fire it when someone decides to move near you- which should be reasonably often if you’re playing up close and personal.
- Executioner 1/3: Executioner is the talent for the big ticket weapon, GMS Tempest Charged Blade. Chip damage from Wide Arc Cleave and Xiaoli’s Ingenuity allow Backswing Cut to tear through squishier NPCs. No Escape specifically enables some shenanigans involving Lotus Projector and missing the attack to Backswing into the original target, though it’s also just generally good for ensuring you hit something.
- Pankrati 2: As a diver, you need to get up close. Pankrati 2 gives you a 1/scene free action “double boost” that slows the enemies you end adjacent to- the accuracy is generally superfluous, but the mobility enables you to hit enemies fast and hard. Try using it to conserve your Xiaoli’s Tenacity and use the rock-explosion effect after you get close for more damage. Prone characters are considered slowed, so Pankrati 1 does give +2 accuracy on melee attacks against them.
Solid Talents
These talents are what I have found to be good- but not necessary.
- Nuclear Cavalier 2-3: Bonus damage for danger zone. FRG is a great overwatch weapon, allowing you to shoulder overcharges or hostile heatgunning.
- Grease Monkey 3: Neutralize attrition. Huge team-wide value and allows you to turn your cavernous repcap into more Thermal Charges or other limited system you enjoy.
- Prospector 1-3: Zheng has terrible boosts, so Prospector 1 is a strict 1/scene upgrade to your boost that generates tunnels that you and allies can use later. Prospector 3 bridges both tunnels, allowing for huge crossmap mobility- something a diver can get great positions for.
- Infiltrator 1: Hiding is somewhat a slow action- but Infiltrator 1 allows you to pass through hostile characters- no hiding requires for this effect. You can cross-up someone with Tenacity and get some surprising angles for backswing- though these plays usually involve getting Overwatched.
- Skirmisher 3: Weave allows you to dodge a reaction attack 1/round, which allows you to wade through Overwatches. Lockbreaker enables a bit of repositioning when you get a DSAS overwatch, but the main draw of this talent tree is Weave.
- Spaceborn 2: Zheng’s poor base speed is a boon with Prone- you can still tenacity after clearing prone. Spaceborn 2 makes you lose very little mobility to Prone, and allows you to fine tune incoming knockback to suit your need. Excellent for frontliners in general- and Zheng is no exception.
Situational Talents
These talents are for specific builds/gear choices.
- Ace 1: Free accuracy and mobility for Hoagiefest, otherwise useless.
- Drone Commander 1: Lotus Projector durability and movement. Don’t expect to use it much with 3 sensors, though.
- Spaceborn 3: Forces difficulty on JK2 checks. It’s neat!
- Hunter 1-3: Backswing Lunge!
- Walking Armory 1-3: Provides utility on your Overwatches. The stellar one is Jager Rounds, which with Nailgun, can knock someone Prone AND Immobilize them. Awesome.
- Dip Talents: These are generic talents that work.
- FA1: Enable hits, enable crits. You’re better off with an ally having this to help you hit, but it’s still nice.
- Empath 2: Reroll a direct hit! It’s good. Also, help an ally autosave a check you know the DC of (burn check is DC10, for example).
- Brutal 1: If you roll a nat 20 on any of your weapons, the target probably dies. Comes up rarely and isn’t necessarily “good,” but a max roll TCB is entertaining.
Body Unbroken (Build Progression)
TCB Zheng is not playable at LL0-1, so we’ll be playing a similar TCB Sagarmatha until then.
- NOTE: Any time CPJ or EVA Module appear, you can exchange them for any other GMS 1 SP system.
LL0
-- GMS Sagarmatha @ LL0 --
[ LICENSES ]
  N/A
[ CORE BONUSES ]
  N/A
[ TALENTS ]
  Executioner 1, Prospector 1, Vanguard 1
[ STATS ]
  HULL:2 AGI:0 SYS:0 ENGI:0
  STRUCTURE:4 HP:14 ARMOR:1
  STRESS:4 HEATCAP:6 REPAIR:5
  TECH ATK:0 LIMITED:+0
  SPD:4 EVA:8 EDEF:8 SENSE:10 SAVE:10
[ WEAPONS ]
  MAIN MOUNT: Shotgun
  FLEX MOUNT: SUPERHEAVY WEAPON BRACING
  HEAVY MOUNT: Tempest Charged Blade
[ SYSTEMS ]
  Armament Redundancy, Personalizations, Type-3 Projected Shield, Rapid Burst Jump Jet System
A generic TCB Sagarmatha. We elect to pick the Size 2 because it covers more space for threat with the shotgun and TCB, and have taken Executioner 1 to make the most of it. Note that most of the power of this talent is concentrated in the first level- so we won’t cap it out until later.
LL1
Respec: Prospector 1 -> Pankrati 1
Gain: Tortuga 1, DSAS, Pankrati 2, +1 Engi
Lose: Prospector 1, GMS Shotgun
-- GMS Sagarmatha @ LL1 --
[ LICENSES ]
  IPS-N Tortuga 1
[ CORE BONUSES ]
  N/A
[ TALENTS ]
  Pankrati 2, Vanguard 1, Executioner 1
[ STATS ]
  HULL:2 AGI:0 SYS:0 ENGI:1
  STRUCTURE:4 HP:15 ARMOR:1
  STRESS:4 HEATCAP:7 REPAIR:5
  TECH ATK:0 LIMITED:+0
  SPD:4 EVA:8 EDEF:8 SENSE:10 SAVE:11
[ WEAPONS ]
  MAIN MOUNT: Deck-Sweeper Automatic Shotgun
  FLEX MOUNT: SUPERHEAVY WEAPON BRACING
  HEAVY MOUNT: Tempest Charged Blade
[ SYSTEMS ]
  Armament Redundancy, Personalizations, Type-3 Projected Shield, Rapid Burst Jump Jet System, Custom Paint Job
Pankrati 2 - An early Pankrati 2 pickup smooths out movement, allowing you to close the distance rapidly and benefit greatly from allied slow/prone.
LL2
Respec: Tortuga 1 -> Zheng 1
Gain: Zheng 2, Zheng Frame, GMS Shotgun, Prospector 1, Molten Wreathe, +1 Engi
Lose: DSAS, Tortuga 1, Sagarmatha Frame, Projected Shield, RBJJ
-- IPS-N Zheng @ LL2 --
[ LICENSES ]
  IPS-N Zheng 2
[ CORE BONUSES ]
  N/A
[ TALENTS ]
  Pankrati 2, Executioner 1, Prospector 1, Vanguard 1
[ STATS ]
  HULL:2 AGI:0 SYS:0 ENGI:2
  STRUCTURE:4 HP:17 ARMOR:2
  STRESS:4 HEATCAP:8 REPAIR:7
  TECH ATK:-2 LIMITED:+1
  SPD:3 EVA:9 EDEF:6 SENSE:3 SAVE:11
[ WEAPONS ]
  MAIN MOUNT: Shotgun
  MAIN MOUNT: SUPERHEAVY WEAPON BRACING
  HEAVY MOUNT: Tempest Charged Blade (Molten Wreathe)
[ SYSTEMS ]
  Armament Redundancy, Personalizations, Total Strength Suite I, Custom Paint Job
Molten Wreathe - A useful damage source against tightly clumped and low-armor targets, Molten Wreathe’s omnidirectional cone can be projected before or after the TCB’s knockback to achieve some range- though the damage leaves something to be desired.
Total Strength Suite I - A mainstay on any Zheng build, TSS1 functions as ~2d6 damage on a single target for a quick action. Useful for dealing with invisible targets- as you can subsequently Tenacity the rock it generates. You can also throw size 1 wrecks with this system, which is both amusing and situationally useful.
LL3
Respec: Prospector 1 -> Vanguard 2
Gain: Tortuga 1, DSAS, Vanguard 3, +1 Agility, Auto-Stabilizing Hardpoints, EVA Module
Lose: GMS Shotgun
-- IPS-N Zheng @ LL3 --
[ LICENSES ]
  IPS-N Zheng 2, IPS-N Tortuga 1
[ CORE BONUSES ]
  Auto-Stabilizing Hardpoints
[ TALENTS ]
  Vanguard 3, Pankrati 2, Executioner 1
[ STATS ]
  HULL:2 AGI:1 SYS:0 ENGI:2
  STRUCTURE:4 HP:18 ARMOR:2
  STRESS:4 HEATCAP:8 REPAIR:7
  TECH ATK:-2 LIMITED:+1
  SPD:3 EVA:10 EDEF:6 SENSE:3 SAVE:12
[ WEAPONS ]
  MAIN MOUNT: Deck-Sweeper Automatic Shotgun
  MAIN MOUNT: SUPERHEAVY WEAPON BRACING
  HEAVY MOUNT: Tempest Charged Blade (Molten Wreathe) // Auto-Stabilizing Hardpoints
[ SYSTEMS ]
  Armament Redundancy, Personalizations, Total Strength Suite I, EVA Module, Custom Paint Job
The build comes fully online at this license level. Nothing new to discuss here.
LL4
Respec: N/A
Gain: Sunzi 1, Blink Charges, Prospector 1, +1 Agi
Lose: Molten Wreathe, EVA Module
-- IPS-N Zheng @ LL4 --
[ LICENSES ]
  IPS-N Zheng 2, IPS-N Tortuga 1, HA Sunzi 1
[ CORE BONUSES ]
  Auto-Stabilizing Hardpoints
[ TALENTS ]
  Vanguard 3, Pankrati 2, Executioner 1, Prospector 1
[ STATS ]
  HULL:2 AGI:2 SYS:0 ENGI:2
  STRUCTURE:4 HP:18 ARMOR:2
  STRESS:4 HEATCAP:8 REPAIR:7
  TECH ATK:-2 LIMITED:+1
  SPD:4 EVA:11 EDEF:6 SENSE:3 SAVE:12
[ WEAPONS ]
  MAIN MOUNT: Deck-Sweeper Automatic Shotgun
  MAIN MOUNT: SUPERHEAVY WEAPON BRACING
  HEAVY MOUNT: Tempest Charged Blade // Auto-Stabilizing Hardpoints
[ SYSTEMS ]
  Armament Redundancy, Personalizations, Total Strength Suite I, Custom Paint Job, Blink Charges x4
Blink Charges - Blink Charge- specifically, Warp Grenade, is a powerful positioning tool. Use it to move yourself and allies around- as well as trying to place enemies clumped together for Tenacity and Backswing Cut. This is an action worth overcharging for, even with your poor e-defense.
LL5
Respec: Prospector 1 -> Executioner 2
Gain: Nelson 1, Bulwark Mods, Executioner 3, +1 Engi
Lose: N/A
-- IPS-N Zheng @ LL5 --
[ LICENSES ]
  IPS-N Zheng 2, IPS-N Tortuga 1, HA Sunzi 1, IPS-N Nelson 1
[ CORE BONUSES ]
  Auto-Stabilizing Hardpoints
[ TALENTS ]
  Vanguard 3, Executioner 3, Pankrati 2
[ STATS ]
  HULL:2 AGI:2 SYS:0 ENGI:3
  STRUCTURE:4 HP:19 ARMOR:2
  STRESS:4 HEATCAP:9 REPAIR:7
  TECH ATK:-2 LIMITED:+1
  SPD:4 EVA:11 EDEF:6 SENSE:3 SAVE:13
[ WEAPONS ]
  MAIN MOUNT: Deck-Sweeper Automatic Shotgun
  MAIN MOUNT: SUPERHEAVY WEAPON BRACING
  HEAVY MOUNT: Tempest Charged Blade // Auto-Stabilizing Hardpoints
[ SYSTEMS ]
  Armament Redundancy, Personalizations, Total Strength Suite I, Custom Paint Job, Blink Charges x4, Bulwark Mods
Executioner 3 - No Escape comes online at this license level, allowing you to reliably hit the TCB against something. You can deliberately backswing into something particularly hard to hit to trigger No Escape to hit the primary target again.
LL6
Respec: N/A
Gain: Nelson 2, Thermal Charges, Prospector 1, +1 Engi
Lose: Bulwark Mods, Custom Paint Job
-- IPS-N Zheng @ LL6 --
[ LICENSES ]
  IPS-N Zheng 2, IPS-N Tortuga 1, HA Sunzi 1, IPS-N Nelson 2
[ CORE BONUSES ]
  Auto-Stabilizing Hardpoints, Reinforced Frame
[ TALENTS ]
  Vanguard 3, Executioner 3, Pankrati 2, Prospector 1
[ STATS ]
  HULL:2 AGI:2 SYS:0 ENGI:4
  STRUCTURE:4 HP:24 ARMOR:2
  STRESS:4 HEATCAP:10 REPAIR:7
  TECH ATK:-2 LIMITED:+2
  SPD:4 EVA:11 EDEF:6 SENSE:3 SAVE:13
[ WEAPONS ]
  MAIN MOUNT: Deck-Sweeper Automatic Shotgun
  MAIN MOUNT: SUPERHEAVY WEAPON BRACING
  HEAVY MOUNT: Tempest Charged Blade (Thermal Charge) // Auto-Stabilizing Hardpoints
[ SYSTEMS ]
  Armament Redundancy, Personalizations, Total Strength Suite I, Blink Charges x5
Reinforced Frame - +5 HP provides a massive boost to survivability. Coupled with 11 Evasion and Destructive Swings, you are a very durable frame. Make sure to position aggressively to make the best use of this.
Thermal Charge - Self explanatory pick. Try to maximize damage out of Thermal Charges and conserve it for when you think the damage would make the difference between a structure or not.
LL7
Respec: N/A
Gain: Saladin 1, Bulwark Mods, Field Analyst 1, +1 Agi
Lose: n/a
-- IPS-N Zheng @ LL7 --
[ LICENSES ]
  IPS-N Zheng 2, HA Sunzi 1, IPS-N Nelson 2, IPS-N Tortuga 1, HA Saladin 1
[ CORE BONUSES ]
  Auto-Stabilizing Hardpoints, Reinforced Frame
[ TALENTS ]
  Vanguard 3, Executioner 3, Pankrati 2, Prospector 1, Field Analyst 1
[ STATS ]
  HULL:2 AGI:3 SYS:0 ENGI:4
  STRUCTURE:4 HP:25 ARMOR:2
  STRESS:4 HEATCAP:10 REPAIR:7
  TECH ATK:-2 LIMITED:+2
  SPD:4 EVA:12 EDEF:6 SENSE:3 SAVE:14
[ WEAPONS ]
  MAIN MOUNT: Deck-Sweeper Automatic Shotgun
  MAIN MOUNT: SUPERHEAVY WEAPON BRACING
  HEAVY MOUNT: Tempest Charged Blade (Thermal Charge) // Auto-Stabilizing Hardpoints
[ SYSTEMS ]
  Armament Redundancy, Personalizations, Total Strength Suite I, Blink Charges x5, Bulwark Mods
Field Analyst 1 - This is a somewhat unremarkable license level, so we take FA1 to bolster our team. This is somewhat of a free space.
Bulwark Mods - Immunity to difficult terrain is always good on a melee frame- but you can swap your Saladin license level out for Caliban 1 Supermassive Mod Decksweeper. This makes the respec a little bit more awkward.
LL8
Respec: Field Analyst 1 -> Nuclear Cavalier 1
Gain: Saladin 2, Flash Anchor, +1 Agi
Lose: N/A
-- IPS-N Zheng @ LL8 --
[ LICENSES ]
  IPS-N Zheng 2, HA Sunzi 1, IPS-N Nelson 2, IPS-N Tortuga 1, HA Saladin 2
[ CORE BONUSES ]
  Auto-Stabilizing Hardpoints, Reinforced Frame
[ TALENTS ]
  Vanguard 3, Executioner 3, Pankrati 2, Nuclear Cavalier 2, Prospector 1
[ STATS ]
  HULL:2 AGI:4 SYS:0 ENGI:4
  STRUCTURE:4 HP:25 ARMOR:2
  STRESS:4 HEATCAP:10 REPAIR:7
  TECH ATK:-2 LIMITED:+2
  SPD:5 EVA:13 EDEF:6 SENSE:3 SAVE:14
[ WEAPONS ]
  MAIN MOUNT: Deck-Sweeper Automatic Shotgun
  MAIN MOUNT: SUPERHEAVY WEAPON BRACING
  HEAVY MOUNT: Tempest Charged Blade (Thermal Charge) // Auto-Stabilizing Hardpoints
[ SYSTEMS ]
  Armament Redundancy, Personalizations, Total Strength Suite I, Blink Charges x5, Flash Anchor
Flash Anchor - Immunity to several forms of involuntary movement, this allows you to avoid being knocked off control zones, as well as generating heat.
Nuclear Cavalier - Flash Anchor and Overcharging generates enough heat to set you into Danger Zone, enabling big hits with the TCB with +1d6 Bonus Damage. This also punishes heatgunning- though you’re still vulnerable with your poor e-defense.
LL9
Respec: Tortuga 1 -> Vlad 1
Gain: Vlad 2, Impaler Nailgun, +1 Hull
Lose: DSAS
-- IPS-N Zheng @ LL9 --
[ LICENSES ]
  IPS-N Zheng 2, HA Sunzi 1, IPS-N Nelson 2, HA Saladin 2, IPS-N Vlad 2
[ CORE BONUSES ]
  Auto-Stabilizing Hardpoints, Reinforced Frame, Superior by Design
[ TALENTS ]
  Vanguard 3, Executioner 3, Nuclear Cavalier 3, Pankrati 2, Prospector 1
[ STATS ]
  HULL:3 AGI:4 SYS:0 ENGI:4
  STRUCTURE:4 HP:28 ARMOR:2
  STRESS:4 HEATCAP:12 REPAIR:7
  TECH ATK:-2 LIMITED:+2
  SPD:5 EVA:13 EDEF:6 SENSE:3 SAVE:15
[ WEAPONS ]
  Integrated: Fuel Rod Gun
  MAIN MOUNT: Impaler Nailgun
  MAIN MOUNT: SUPERHEAVY WEAPON BRACING
  HEAVY MOUNT: Tempest Charged Blade (Thermal Charge) // Auto-Stabilizing Hardpoints
[ SYSTEMS ]
  Armament Redundancy, Personalizations, Total Strength Suite I, Blink Charges x5, Flash Anchor, Bulwark Mods
Superior By Design - This license level is a big spike in power. SBD sets our heatcap to a very comfortable 12 and gives immunity to Impair- allowing you to shake off Structure and Stress rolls, as well as enemy fragsigs and other features that would otherwise remove the Accuracy from the TCB.
Impaler Nailgun - A solid CQB weapon in its own right, the Impaler Nailgun’s Immobilization is threatening even with Zheng’s mediocre save target- as failure enables Pankrati 1 and dooms a lot of NPCs to a swift death. Self heat is crucial, as it’s a stable, low action cost form of heat generation that activates Nuclear Cavalier when you hit danger zone. You can keep DSAS and run Supermassive instead if you want more damage, but NPCs at this tier of play start becoming very evasive and bulky- where Nailgun’s lack of the innaccurate tag and utility start to pull ahead. We juggle the two weapons for the next license levels to grab other systems, as they’re both threatening CQB options.
Nuclear Cavalier 3 - Fuel Rod Gun is a second CQB option we have to clear a third of our heatcap by firing it. Best used as an Overwatch, FRG allows you to juggle heat to stave off stress damage to spam Flash Anchor to keep yourself where you need to be.
LL10
Respec: Vlad 2 -> Dusk Wing 2
Gain: Tortuga 1, DSAS, Flickerfield Projector, Field Analyst 1, +1 Hull
Lose: Impaler Nailgun
-- IPS-N Zheng @ LL10 --
[ LICENSES ]
  IPS-N Zheng 2, HA Sunzi 1, IPS-N Nelson 2, HA Saladin 2, IPS-N Tortuga 1, SSC Dusk Wing 2
[ CORE BONUSES ]
  Auto-Stabilizing Hardpoints, Reinforced Frame, Superior by Design
[ TALENTS ]
  Vanguard 3, Executioner 3, Nuclear Cavalier 3, Pankrati 2, Prospector 1, Field Analyst 1
[ STATS ]
  HULL:4 AGI:4 SYS:0 ENGI:4
  STRUCTURE:4 HP:30 ARMOR:2
  STRESS:4 HEATCAP:12 REPAIR:8
  TECH ATK:-2 LIMITED:+2
  SPD:5 EVA:13 EDEF:6 SENSE:3 SAVE:15
[ WEAPONS ]
  Integrated: Fuel Rod Gun
  MAIN MOUNT: Deck-Sweeper Automatic Shotgun
  MAIN MOUNT: SUPERHEAVY WEAPON BRACING
  HEAVY MOUNT: Tempest Charged Blade (Thermal Charge) // Auto-Stabilizing Hardpoints
[ SYSTEMS ]
  Armament Redundancy, Personalizations, Total Strength Suite I, Blink Charges x5, Flash Anchor, Flicker Field Projector
Flickerfield Projector - 1/round invisibility. Forces the GM to either eat it with a less important attack first or gamble a big attack possibly missing. Works against tech attacks, which is nice. Very cheap on SP, which is great for a mech with poor base SP like Zheng.
LL11
Respec: Field Analyst 1 -> Prospector 2
Gain: Prospector 3, Dusk Wing 3, StunCrown, +1 Agi
Lose: Personalizations
-- IPS-N Zheng @ LL11 --
[ LICENSES ]
  IPS-N Zheng 2, HA Sunzi 1, IPS-N Nelson 2, HA Saladin 2, IPS-N Tortuga 1, SSC Dusk Wing 3
[ CORE BONUSES ]
  Auto-Stabilizing Hardpoints, Reinforced Frame, Superior by Design
[ TALENTS ]
  Vanguard 3, Executioner 3, Nuclear Cavalier 3, Prospector 3, Pankrati 2
[ STATS ]
  HULL:4 AGI:5 SYS:0 ENGI:4
  STRUCTURE:4 HP:29 ARMOR:2
  STRESS:4 HEATCAP:12 REPAIR:8
  TECH ATK:-2 LIMITED:+2
  SPD:5 EVA:14 EDEF:6 SENSE:3 SAVE:16
[ WEAPONS ]
  Integrated: Fuel Rod Gun
  MAIN MOUNT: Deck-Sweeper Automatic Shotgun
  MAIN MOUNT: SUPERHEAVY WEAPON BRACING
  HEAVY MOUNT: Tempest Charged Blade (Thermal Charge) // Auto-Stabilizing Hardpoints
[ SYSTEMS ]
  Armament Redundancy, Total Strength Suite I, Blink Charges x5, Flash Anchor, Flicker Field Projector, StunCrown x4
Prospector 3 - An awesome talent rank. Use it as a boost for yourself, or to link two sides of the map together. You now can run the formidable “blinkspector” roll-out turn 1 where you Blink -> Prosp -> Oc Blink your team forward into the fray- the later tunnel you make can be used to rotate back to protect backliners from NPCs who dive them. StunCrown - StunCrown matches TCB’s threat. By playing for Backswing, you also play for Stuncrown angles- it’s a great first-activation tool for when you can catch a lot of targets, or as an emergency button if you dive too deep. Stack the save for Impair first before the save for Jam.
LL12
Respec: Tortuga 1 -> Vlad 2
Gain: All-Theater Movement Suite, Ace 1, +1 Agi
Lose: DSAS
-- IPS-N Zheng @ LL12 --
[ LICENSES ]
  IPS-N Zheng 2, HA Sunzi 1, IPS-N Nelson 2, HA Saladin 2, SSC Dusk Wing 3, IPS-N Vlad 2
[ CORE BONUSES ]
  Auto-Stabilizing Hardpoints, Reinforced Frame, Superior by Design, All-Theater Movement Suite
[ TALENTS ]
  Vanguard 3, Executioner 3, Nuclear Cavalier 3, Prospector 3, Pankrati 2, Ace 1
[ STATS ]
  HULL:4 AGI:6 SYS:0 ENGI:4
  STRUCTURE:4 HP:29 ARMOR:2
  STRESS:4 HEATCAP:12 REPAIR:8
  TECH ATK:-2 LIMITED:+2
  SPD:6 EVA:15 EDEF:6 SENSE:3 SAVE:16
[ WEAPONS ]
  Integrated: Fuel Rod Gun
  MAIN MOUNT: Impaler Nailgun
  MAIN MOUNT: SUPERHEAVY WEAPON BRACING
  HEAVY MOUNT: Tempest Charged Blade (Thermal Charge) // Auto-Stabilizing Hardpoints
[ SYSTEMS ]
  Armament Redundancy, Total Strength Suite I, Blink Charges x5, Flash Anchor, Flicker Field Projector, StunCrown x4
All-Theater Movement Suite/Ace 1 - This build’s capstone takes it to Wawa Hoagiefest, becoming a sturdy, fast, flying melee striker. Ace 1 provides Accuracy to Agility checks and saves- but what we really want is Acrobatics, which allows you to turn FFP and your excellent evasion into even more speed. Ask your GM how destructive swings and total strength suite’s rocks interact with flight- generally you’ll skim the ground at around height 1 or 2 to “down air” and destroy objects beneath you with Tenacity.
Snow on the Sand (Example Builds)
LL3
-- IPS-N Zheng @ LL3 --
[ LICENSES ]
  IPS-N Zheng 2, IPS-N Tortuga 1
[ CORE BONUSES ]
  Auto-Stabilizing Hardpoints
[ TALENTS ]
  Vanguard 3, Pankrati 2, Executioner 1
[ STATS ]
  HULL:3 AGI:0 SYS:0 ENGI:2
  STRUCTURE:4 HP:20 ARMOR:2
  STRESS:4 HEATCAP:8 REPAIR:7
  TECH ATK:-2 LIMITED:+1
  SPD:3 EVA:9 EDEF:6 SENSE:3 SAVE:12
[ WEAPONS ]
  MAIN MOUNT: Deck-Sweeper Automatic Shotgun
  MAIN MOUNT: SUPERHEAVY WEAPON BRACING
  HEAVY MOUNT: Tempest Charged Blade // Auto-Stabilizing Hardpoints
[ SYSTEMS ]
  Armament Redundancy, Personalizations, Total Strength Suite I, Type-I Flight System, Custom Paint Job
The quintessential hoagiefest core. Nothing special otherwise.
LL6
-- IPS-N Zheng @ LL6 --
[ LICENSES ]
  IPS-N Zheng 2, IPS-N Tortuga 1, SSC Atlas 3
[ CORE BONUSES ]
  Auto-Stabilizing Hardpoints, Gyges Frame
[ TALENTS ]
  Vanguard 3, Spaceborn 3, Pankrati 2, Executioner 1
[ STATS ]
  HULL:4 AGI:0 SYS:0 ENGI:4
  STRUCTURE:4 HP:23 ARMOR:2
  STRESS:4 HEATCAP:10 REPAIR:8
  TECH ATK:-2 LIMITED:+2
  SPD:3 EVA:9 EDEF:6 SENSE:3 SAVE:13
[ WEAPONS ]
  MAIN MOUNT: Deck-Sweeper Automatic Shotgun
  MAIN MOUNT: SUPERHEAVY WEAPON BRACING
  HEAVY MOUNT: Tempest Charged Blade (Molten Wreathe) // Auto-Stabilizing Hardpoints
[ SYSTEMS ]
  Armament Redundancy, Personalizations, Total Strength Suite I, Jäger Kunst II x5
Combining Gyges Frame and Spaceborn 3, this build is sure to win most Fatal Clashes it provokes, using the movement to align hits with Backswing Cut and reposition for Xiaoli’s Tenacity. Note that Spaceborn 3 will give difficulty on the TSS1 save, as it does deal knockback.
-- IPS-N Zheng @ LL6 --
[ LICENSES ]
  IPS-N Zheng 2, IPS-N Tortuga 1, SSC Mourning Cloak 1, IPS-N Nelson 2
[ CORE BONUSES ]
  Auto-Stabilizing Hardpoints, Integrated Weapon
[ TALENTS ]
  Vanguard 3, Hunter 3, Pankrati 2, Executioner 1
[ STATS ]
  HULL:4 AGI:0 SYS:0 ENGI:4
  STRUCTURE:4 HP:23 ARMOR:2
  STRESS:4 HEATCAP:10 REPAIR:8
  TECH ATK:-2 LIMITED:+2
  SPD:3 EVA:9 EDEF:6 SENSE:3 SAVE:13
[ WEAPONS ]
  INTEGRATED WEAPON: Fold Knife
  MAIN MOUNT: Deck-Sweeper Automatic Shotgun
  MAIN MOUNT: SUPERHEAVY WEAPON BRACING
  HEAVY MOUNT: Tempest Charged Blade (Thermal Charge) // Auto-Stabilizing Hardpoints
[ SYSTEMS ]
  Armament Redundancy, Personalizations, Total Strength Suite I, Type-I Flight System
Backswing Lunge! Use Hunter 3 and Integrated Weapon to rapidly reposition between swings of the TCB- though be wary of throwing the knife, as you won’t be able to attack with it until you pick it up. Note that Fold Knives are not necessary for this build- any aux melee works.
LL9
-- IPS-N Zheng @ LL9 --
[ LICENSES ]
  IPS-N Zheng 2, HA Saladin 3, SSC Dusk Wing 2, IPS-N Vlad 2
[ CORE BONUSES ]
  Auto-Stabilizing Hardpoints, Overpower Caliber, Reinforced Frame
[ TALENTS ]
  Vanguard 3, Nuclear Cavalier 3, Executioner 3, Pankrati 2, Brutal 1
[ STATS ]
  HULL:3 AGI:4 SYS:0 ENGI:4
  STRUCTURE:4 HP:28 ARMOR:2
  STRESS:4 HEATCAP:10 REPAIR:7
  TECH ATK:-2 LIMITED:+2
  SPD:5 EVA:13 EDEF:6 SENSE:3 SAVE:15
[ WEAPONS ]
  Integrated: Fuel Rod Gun
  MAIN MOUNT: Impaler Nailgun
  MAIN MOUNT: SUPERHEAVY WEAPON BRACING
  HEAVY MOUNT: Tempest Charged Blade (Paracausal Mod) // Auto-Stabilizing Hardpoints, Overpower Caliber
[ SYSTEMS ]
  Armament Redundancy, Personalizations, Total Strength Suite I, Flicker Field Projector, Flash Anchor, Custom Paint Job
Do you ever want to kill someone dead? Paracausal TCB stacked to the heavens eats all of your SP, but in return demolishes anything it comes into contact with. Very fun.
LL12
-- IPS-N Zheng @ LL12 --
[ LICENSES ]
  IPS-N Zheng 2, IPS-N Nelson 2, HA Saladin 2, HA Napoleon 3, HA Sunzi 1, IPS-N Vlad 2
[ CORE BONUSES ]
  Auto-Stabilizing Hardpoints, Reinforced Frame, Superior by Design, Overpower Caliber
[ TALENTS ]
  Vanguard 3, Nuclear Cavalier 3, Executioner 3, Prospector 3, Pankrati 2, Infiltrator 1
[ STATS ]
  HULL:4 AGI:6 SYS:0 ENGI:4
  STRUCTURE:4 HP:29 ARMOR:2
  STRESS:4 HEATCAP:12 REPAIR:8
  TECH ATK:-2 LIMITED:+2
  SPD:6 EVA:15 EDEF:6 SENSE:3 SAVE:16
[ WEAPONS ]
  Integrated: Fuel Rod Gun
  MAIN MOUNT: Impaler Nailgun
  MAIN MOUNT: SUPERHEAVY WEAPON BRACING
  HEAVY MOUNT: Tempest Charged Blade (Thermal Charge) // Auto-Stabilizing Hardpoints, Overpower Caliber
[ SYSTEMS ]
  Armament Redundancy, Total Strength Suite I, Flash Anchor, Blink Charges x5, Blinkshield, Bulwark Mods
A formidable variant of the LL12 build earlier, this build runs Blinkshield as an emergency button to bail out of overzealous dives- or as a thunderdome to trap foes within. It runs Infiltrator 1 as it’s unable to simply fly over enemy heads to get into good positions