Electronic Assault - Chomolungma
Author: Majin Evelyn
Table of contents
Introduction
Chomolungma is an incredibly versatile GMS frame, with many built in tools that lend to being primarily a Controller.
- Premium 15 sensors, +1 Tech Attack, and 11 Save Target stat line for controllers
- Replaceable Parts and respectable survivability stats make this mech quite resilient in campaign play
- Built in unique invade options, Balance Control Lockout and System Crusher
- Every time you hit a tech attack, you Scan the target, giving you and your team more information to deal with NPC optionals and templates. Normally, scanning is not worth a quick action, but the Chomolungma does it for free as part of its typical gameplan.
- Brilliance, giving you another invade or other tech option as a free action 1/scene (on top of a free lock on)
- Wide Area Code Pulse is one of the strongest Core Actives in the game, delivering invades to every enemy within sensors, even ignoring Invisible and applying Impair if any of the attacks miss
- Main/aux + flex mounts that are flexible and ideal for controllers, even allowing for the Chomolungma to deal respectable damage if built for it
There are many very strong ways to build Chomolungma, but this build will aim for versatility in its tools. Notably we opt for an Assault Cannon with Overpower Caliber to deal respectable damage with a skirmish, comparable to a Heavy Machine Gun with Auto-Stabilizing Hardpoints. As many control tools as you have, often it can be very helpful to clean up kills your Strikers have gotten low. Turret Drones also do this to a degree, contributing a few extra points of damage when an ally hits an enemy. 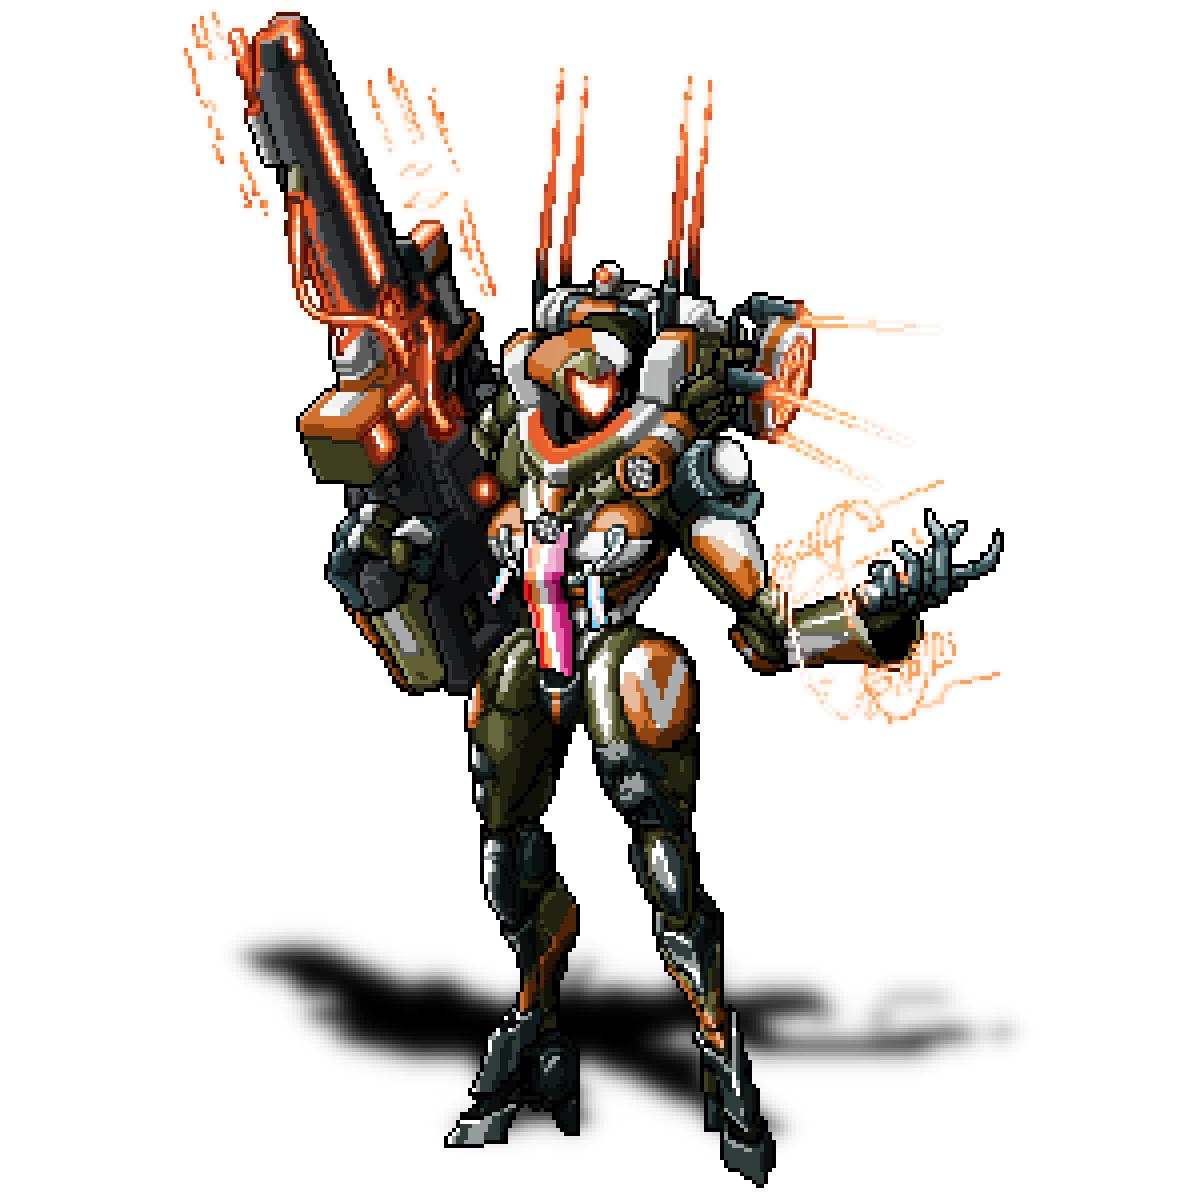

Art Credits: Cuntmolungma and Shitbox Turret by shep (@hyponumangel) - bsky, includes Retrograde Minis assets
Article Format
This article will cover every License Level from 0 to 12, and will include strategies based on the new options gained. This can serve as a progression guide for a campaign starting at LL0 or any other level, or used for one-shots effectively at any level.
Additionally, we will be following the Core Rulebook’s rules for “Reallocating Points” as described below. In my experience, many tables are less restrictive with “respecs” than these rules describe, but for the sake of this article we will be using these rules to be as helpful to as many players as possible in campaigns.
REALLOCATING POINTS
Every time your pilot’s LL increases, you also have the option to choose one:
- Reallocate all ranks from one of your talents to any other talent.
- Reallocate all ranks from one of your licenses to any other license.
- Replace one core bonus with another core bonus for which your pilot qualifies.
If reallocating ranks from one license to another means your pilot no longer qualifies for a core bonus, you must replace that core bonus with one you now qualify for.
Strategy
As this build will use the same frame and maintain a few other core tools for its whole progression, we will review those here in the introduction. Each new level we’ll briefly explain the new additions, and every 3 levels will contain another overview of how the strategy comes together. Additionally, the below spreadsheet can be used to help keep track of important tools, resources, and actions available for this build. There are tabs for License Levels 3, 6, 9, and 12, as well as a tab to help you make decisions about dealing with various NPC classes, and another tab as a NPC stat reminder.
LL3-12 tabs made by Majin Evelyn
NPC Stats tab made by @euroliis on discord
NPC Target Priority tab majorly based on a similar spreadsheet made by @nihxen on discord
Control
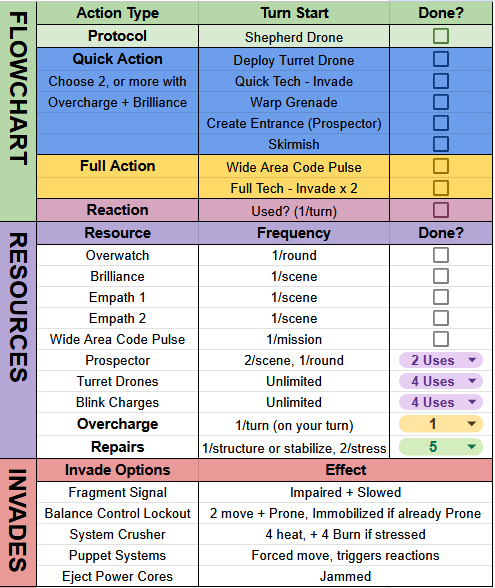
On many turns you will be taking a Quick Tech action to Invade a target, or a Full Tech to Invade two targets. You have 3 Invade options at LL0, and 5 from LL1 and beyond.
- Fragment Signal - Despite being the basic invade available to all builds, Impair and Slow can actually deny enemy actions in a lot of situations. Especially when combined with other tools from you or your team that Prone such as Jager Rounds from Walking Armory, or Balance Control Lockout
- Balance Control Lockout - Similar to Puppet Systems, this forces 2 spaces of movement for the target. It then knocks them Prone, or Immobilizes them if they’re already Prone. Depending on the situation, this option has the potential to deny a lot of enemy actions, especially for melee/short range NPCs. Even the Prone option without any additional control being applied can significantly reduce an NPC’s options. You put them effectively 2 + [Their Speed] away from where they want to go, on top of the accuracy that Prone provides to your team. On this build, Jager Rounds from Walking Armory will be your main way to apply prone yourself, giving you an opportunistic way to Immobilize a target should they fail the Saving Throw against prone. When a target is Immobilized, they can’t stand up from prone, effectively extending the control against their movement for another turn.
- System Crusher - This Invade option is useful when you know you can Stress a target, which is made easier because you’re always scanning. However, this build is not playing for this option, so you will likely only use this if you have other Controllers on your team, or against specific NPCs like Scourers.
- Puppet Systems - The target is thrown in a direction of your choice, but unlike other forced movement it provokes reactions like Overwatch. Do this to an NPC next to 1 or 2 of your teammates, or even yourself, and you can effectively deal some very significant damage for one quick action. This will typically push further than Balance Control Lockout, which is sometimes worth it over the 2 spaces with Prone.
- Eject Power Cores - This will often be your default invade option, as Jammed is an effective control option against most NPCs in the game. It turns off most strong actions targets will have, which is why this effect is limited to once per scene, per target. Notably, if other pilots in your party also have this Invade option, they have a separate limit per scene, allowing you to chain Jammed against scary targets. Despite its strength, this does not stop the target from moving, which may be more important when trying to control objectives. Use Balance Control Lockout, Puppet Systems or Warp Grenades in such cases. One of your frame traits, Brilliance, will allow you to Invade or take most other Quick Actions on this build as a free action, once per scene. This can be combined with Overcharge for a particular effective “Nova” turn, applying a large amount of control all at once when needed. Brilliance even lets you apply Lock-On, making your Assault Cannon or next Invade shoot at +1 accuracy, or enabling Drone Commander 2 for your build later on.
Chomolungma’s Core Active is immensely powerful, letting you Invade everything within your sensor range, regardless of Line of Sight or Invisibility. This can easily affect all enemy NPCs on a map, with proper positioning. Even if these attacks miss, the targets are Impaired anyway. For the round that you use Wide Area Code Pulse, your party will undeniably have a massive advantage over the enemy forces, possibly swinging the whole encounter in your favor. Any teammates using the Leader talent can give you accuracy on all of these attacks, as it is one action.
Movement
Prospector - Creating reusable tunnels for yourself and allies is a very efficient movement tool. With just Prospector 1, you get a slightly better boost for yourself, along with giving your Size 1/2 or 1 allies effectively 7 movement, if they go edge to edge within the blast. This action is typically most effective to take on the first activation of the first round of combat, since your allies can plan to be adjacent to you to use the tunnel anyway. For 5 levels of this progression, we’ll also have Prospector 2 and 3. This will let our allies immediately use the tunnels as a reaction, as well as allow us to make another pair of tunnels, which are all connected.
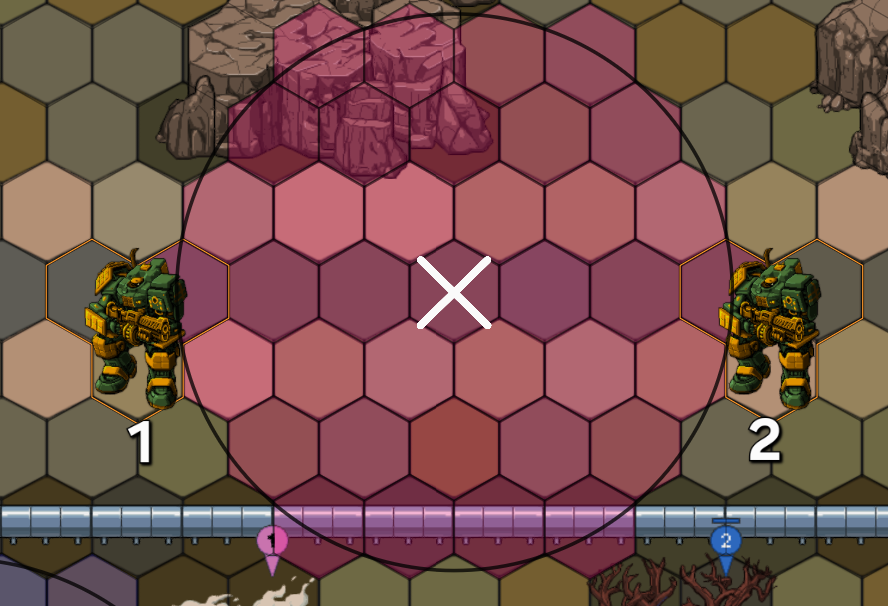
Blink Charges - When used as Warp Grenades, these are an exceptionally powerful movement and dispution tool. In combination with Prospector 3, you can move you and your whole team very far across the map in one turn. Often useful on the first round of combat, Warp Grenades can gather up your allies next to you, followed by a Prospector tunnel that your allies can immediately follow. Because the blast 3 extends vertically, you can also use it to position you and your team on top of terrain without having to use flight or climbing.
Warp Grenades also confer a nefarious, hostile purpose though: Rearranging enemies within that same Blast 3. You can move enemies to one side of the blast, and your allies to the other, putting a lot of space in between to deny effective actions. You can move multiple enemies off of an objective or objective zone, and allies onto it for scoring purposes. Enemies can be teleported out of engagement with allies, saving them from otherwise being hit with hostile Overwatch attacks. Since you get to resolve simultaneous effects in whichever order you choose, you can also see if enemies fail their Engineering save first before you decide where to position allies.
These Grenades are Limited, but even the value we get from the 4 we’ll have at LL2 is massive. 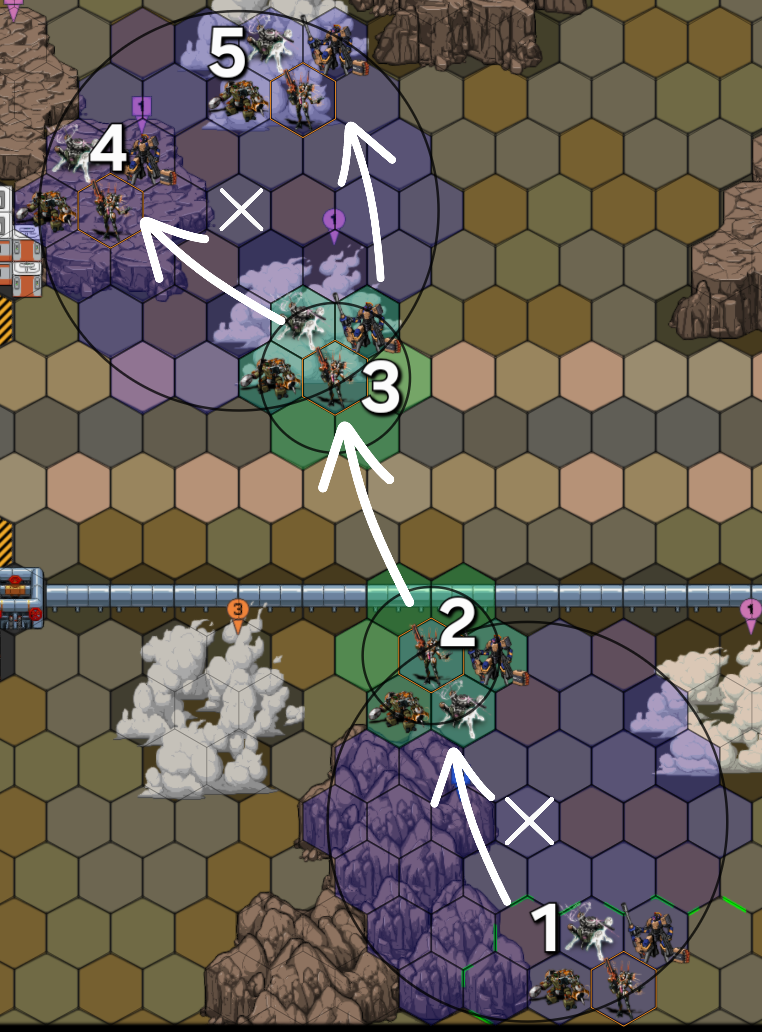
The above screenshot represents a common scenario and series of options for round 1 of many combats with this build.
- Coordinating with our allies to group up within the Player Deployment zone to Position 1, we throw a Warp Grenade as a Quick Action, centered on the white X. The Blue Blast 3’s are our Warp Grenade Blasts. We reposition ourselves and allies slightly on the opposite end of the Warp Grenade to Position 2.
- Create Entrance with the Prospector Talent at Position 2, going to Position 3. The Green areas are our Entrance burst zones. If we have Prospector 2, our size 1 or smaller allies can immediately follow us to Position 3.
- If we want to move ourselves and/or our allies further, we can Overcharge for a second Warp Grenade, centered on the white X. We can move from Position 3 to Position 4 or 5, depending on if we want height or cover.
If you have size 2 or 3 allies in your party, you don’t have to include all hexes they occupy for the start or end of the Warp Grenade teleportation. So at Position 1, you only include their right-most hex, and at Position 2 you only include their left-most hex. In this way, you can give them some additional value and movement.
Damage
As a Chomolungma, we don’t have a Heavy mount or a damage trait, so our primary role will not be to deal damage. However, we can make some investments to make our Main/Aux mount quite respectable to Skirmish with. Until LL3, we use an Assault Rifle/Nexus (Light) mount when we need to finish off a target. Our second mount will have two Missile Racks in it until LL6. The intent here is to only ever fire them once per scene, if at all, and never reload them. They can be helpful to deal with Squads, or to capitalize on a few grouped up enemies. I don’t recommend ever Barraging on this build, as while a Skirmish here and there may be useful to finish off a target, a Barrage is an overcommitment when we have so many other powerful options available to us. While our Brilliance trait doesn’t let us Skirmish as a Free Action like the Everest’s Initiative trait, it does give us a free Lock On, which we can then consume with a Skirmish to increase our effective damage output.
We also have Turret Drones until LL8, which can be used to finish off targets your allies hit. It simply deals an extra 3 damage, no rolling to hit required. It’s best to deploy one on your first or second round of combat, and use Drone Commander 1’s Shepherd Drone protocol to move it with you as you move through the map. The reaction is once per round, per drone, so if you have 2 on the field you can use the reaction for 2 separate attacks made by allies on different turns.
Progression
LL0
-- GMS Chomolungma @ LL0 --
[ LICENSES ]
  N/A
[ CORE BONUSES ]
  N/A
[ TALENTS ]
  Prospector 1, Drone Commander 1, Field Analyst 1
[ STATS ]
  HULL:0 AGI:0 SYS:0 ENGI:2
  STRUCTURE:4 HP:12 ARMOR:0
  STRESS:4 HEATCAP:8 REPAIR:4
  TECH ATK:+1 LIMITED:+1
  SPD:4 EVA:8 EDEF:10 SENSE:15 SAVE:11
[ WEAPONS ]
  MAIN/AUX MOUNT: Assault Rifle / Nexus (Light)
  FLEX MOUNT: Missile Rack / Missile Rack
[ SYSTEMS ]
  Personalizations, Armament Redundancy, Turret Drones x4, Type-3 Projected Shield, EVA Module
Drone Commander 1 - You need this for any drone build, in my opinion, even if you just have Turrets. Their HP gets doubled to 10, and you can move them 4 spaces each turn as a protocol. Often this means you can deploy one and drag it with you the whole scene.
Field Analyst 1 - 1/round your can turn your allies’ misses into hits, if they miss by 1. Helps to secure important hits at this level, especially when nobody will have any Grit and likely minimal Accuracy.
Prospector 1 - We only have 1 tunnel right now, but this will significantly improve the movement of our party on its own.
Armament Redundancy - Once per scene you can use this to ignore Weapons Down as the result of Structure damage. Pretty useful, don’t forget to use it when you get this Structure outcome.
EVA Module - This is your first pick for destruction when you get the Systems Down outcome for Structure Damage. For this reason, this is often referred to as an “ablative system.” Outside of that use, getting to ignore water can be somewhat to very useful, depending on the map. If you are venturing into space, this system is frankly required to be able to move around properly.
Personalizations - Unlike every other system we have equipped now, we will never part with Personalizations. 2 HP per structure is worth a Hull point and results in a pretty significant increase in your effective health. It’s even destructible for Systems Down, if you really can’t part with your other systems, but you will lose the HP for subsequent structures.
Type-3 Projected Shield - This only requires line of sight, so you can even impose difficulty against the sniper 30 spaces away from you. 1 heat as a protocol is a low cost to potentially save you from some important hits, so you can likely get some value out of this on most turns.
LL1
Respec: Field Analyst 1 -> Prospector 2
Gain: HORUS Goblin 1, Prospector 3, +1 HULL, H0R_OS System Upgrade I
Lose: Field Analyst 1, Armament Redundancy
-- GMS Chomolungma @ LL1 --
[ LICENSES ]
  HORUS Goblin 1
[ CORE BONUSES ]
  N/A
[ TALENTS ]
  Prospector 3, Drone Commander 1
[ STATS ]
  HULL:1 AGI:0 SYS:0 ENGI:2
  STRUCTURE:4 HP:15 ARMOR:0
  STRESS:4 HEATCAP:8 REPAIR:4
  TECH ATK:+1 LIMITED:+1
  SPD:4 EVA:8 EDEF:10 SENSE:15 SAVE:12
[ WEAPONS ]
  MAIN/AUX MOUNT: Assault Rifle / Nexus (Light)
  FLEX MOUNT: Missile Rack / Missile Rack
[ SYSTEMS ]
  Personalizations, H0R_OS System Upgrade I, Turret Drones x4, EVA Module, Type-3 Projected Shield
H0R_OS System Upgrade 1 - The core Invade suite to this build. Many of your turns going forward will include an option from this suite.
Prospector 3 - We can now make a second set of tunnels, and our allies around us can immediately follow us when we make them.
LL2
Respec: None
Gain: HA Sunzi 1, Field Analyst 1, +1 HULL, Blink Charges
Lose: EVA Module, Type-3 Projected Shield
-- GMS Chomolungma @ LL2 --
[ LICENSES ]
  HORUS Goblin 1, HA Sunzi 1
[ CORE BONUSES ]
  N/A
[ TALENTS ]
  Prospector 3, Drone Commander 1, Field Analyst 1
[ STATS ]
  HULL:2 AGI:0 SYS:0 ENGI:2
  STRUCTURE:4 HP:17 ARMOR:0
  STRESS:4 HEATCAP:8 REPAIR:5
  TECH ATK:+1 LIMITED:+1
  SPD:4 EVA:8 EDEF:10 SENSE:15 SAVE:12
[ WEAPONS ]
  MAIN/AUX MOUNT: Assault Rifle / Nexus (Light)
  FLEX MOUNT: Missile Rack / Missile Rack
[ SYSTEMS ]
  Personalizations, H0R_OS System Upgrade I, Turret Drones x4, Blink Charges x4
Blink Charges - Warp Grenades are our premier movement option, for enemies and ourselves. This often outpaces Puppet Systems for both enemy and allied movement, as it can usually perform more than one function at once. This is further explained in great detail in the Movement section.
LL3
Respec: Field Analyst 1 -> Empath 1
Gain: IPS-N Drake 1, Overpower Caliber, Empath 2, +1 SYS, Assault Cannon, EVA Module
Lose: Assault Rifle
-- GMS Chomolungma @ LL3 --
[ LICENSES ]
  HA Sunzi 1, HORUS Goblin 1, IPS-N Drake 1
[ CORE BONUSES ]
  Overpower Caliber
[ TALENTS ]
  Prospector 3, Empath 2, Drone Commander 1
[ STATS ]
  HULL:2 AGI:0 SYS:1 ENGI:2
  STRUCTURE:4 HP:18 ARMOR:0
  STRESS:4 HEATCAP:8 REPAIR:5
  TECH ATK:+2 LIMITED:+1
  SPD:4 EVA:8 EDEF:11 SENSE:15 SAVE:13
[ WEAPONS ]
  MAIN/AUX MOUNT: Assault Cannon / Nexus (Light) // Overpower Caliber
  FLEX MOUNT: Missile Rack / Missile Rack
[ SYSTEMS ]
  Personalizations, H0R_OS System Upgrade I, Blink Charges x4, Turret Drones x4, EVA Module
Assault Cannon (with Overpower Caliber) - Skirmishing with your Main/Aux mount is quite a bit better now, offering comparable damage to a single Skirmish from a Heavy Machine Gun with Auto-Stabilizing Hardpoints applied. You don’t want to Spin up this weapon, because the quick action and being Slowed are not worth the Reliable 3. 1d6+2 with Overkill is already plenty strong for a main, even at the cost of 1 Heat.
Empath 2 - This can prevent an ally from becoming Stunned or having their mech instantly destroyed due to the Direct Hit result from Structure Damage. This is 1/scene, but that alone can be very important insurance to prevent a total mission loss. In harder missions, I would say that this a must for at least one person in the party, but if you want a more selfish option consider Skirmisher 2.
Strategy
The core of the build is here now, with H0R_OS 1, Blink Charges, and Assault Cannon. At the start of combat, you will want to help move your team forward with Prospector and Warp Grenades. You can save your second use of Prospector until later in the combat, so that you and your allies can tunnel back towards Player Deployment, or just to move them further forward again. If you can afford to, placing a Turret Drone on the first or second round of combat is also good value, as it will likely live for the whole combat and help allies finish off targets. Don’t forget to use the Shepherd Drone protocol to move it with you.
As a controller, you will often be invading enemies at least once on each of your turns. Eject Power Cores will be your default Invade option that you’ll rotate between different enemies, since it can only Jam enemies once per scene. Your Assault Cannon is a finisher tool for already weakened targets, or as a filler option when you don’t have a better quick action to take. While you do have a solid Skirmish on this build, you are not a Striker, and don’t need to shoot something every turn.
You have an extremely powerful Core Active in Wide Area Code Pulse, but remember that it isn’t Efficient, so you can only use it once per mission. Whether you use it on a given combat or not depends on your other teammate’s Core Active usage for the combat, your team’s positioning, how much of the enemies you can get within your sensors for it, and how critical dealing with possible Invisibility is. This option is exceptionally powerful, and will swing the combat in your team’s favor immediately, but be mindful of when you use it.
Don’t forget about Empath 2 when allies structure, as this can save them from a Stun or mech destruction from Direct Hit.
LL4
Respec: None
Gain: IPS-N Caliban, Walking Armory 1, +1 SYS, Supermassive Mod (Assault Cannon)
Lose: None
-- GMS Chomolungma @ LL4 --
[ LICENSES ]
  HA Sunzi 1, HORUS Goblin 1, IPS-N Drake 1, IPS-N Caliban 1
[ CORE BONUSES ]
  Overpower Caliber
[ TALENTS ]
  Prospector 3, Empath 2, Drone Commander 1, Walking Armory 1
[ STATS ]
  HULL:2 AGI:0 SYS:2 ENGI:2
  STRUCTURE:4 HP:18 ARMOR:0
  STRESS:4 HEATCAP:8 REPAIR:5
  TECH ATK:+3 LIMITED:+1
  SPD:4 EVA:8 EDEF:12 SENSE:15 SAVE:13
[ WEAPONS ]
  MAIN/AUX MOUNT: Assault Cannon (Supermassive Mod) / Nexus (Light) // Overpower Caliber
  FLEX MOUNT: Missile Rack / Missile Rack
[ SYSTEMS ]
  Personalizations, H0R_OS System Upgrade I, Blink Charges x4, Turret Drones x4, EVA Module
Walking Armory 1 - Of the options here, giving our Assault Cannon Arcing can be quite useful to get around cover and maintain our own.
Supermassive Mod (Assault Cannon) - This gives our main weapon some minor knockback for no additional heat cost, sometimes useful to break engagement on your allies.
LL5
Respec: None
Gain: IPS-N Vlad 1, Walking Armory 2, +1 HULL, Type-3 Projected Shield
Lose: EVA Module
-- GMS Chomolungma @ LL5 --
[ LICENSES ]
  HA Sunzi 1, HORUS Goblin 1, IPS-N Drake 1, IPS-N Caliban 1, IPS-N Vlad 1
[ CORE BONUSES ]
  Overpower Caliber
[ TALENTS ]
  Prospector 3, Empath 2, Walking Armory 2, Drone Commander 1
[ STATS ]
  HULL:3 AGI:0 SYS:2 ENGI:2
  STRUCTURE:4 HP:21 ARMOR:0
  STRESS:4 HEATCAP:8 REPAIR:5
  TECH ATK:+3 LIMITED:+1
  SPD:4 EVA:8 EDEF:12 SENSE:15 SAVE:14
[ WEAPONS ]
  MAIN/AUX MOUNT: Assault Cannon (Supermassive Mod) / Nexus (Light) // Overpower Caliber
  FLEX MOUNT: Missile Rack / Missile Rack
[ SYSTEMS ]
  Personalizations, H0R_OS System Upgrade I, Blink Charges x4, Turret Drones x4, Type-3 Projected Shield
Walking Armory 2 - We’re mainly here for the Jager Rounds option, which adds knockback 2 to one of our Main weapon attacks, as well as knocking the target Prone if they fail a Hull save. With Supermassive Mod, this is Knockback 3, which is quite significant on its own as a displacement tool. If the target fails the Hull save against Prone, you can even Immobilize them with Balance Control Lockout after to deny multiple turns of movement.
LL6
Respec: Prospector 3 -> Vanguard 3
Gain: IPS-N Vlad 2, Reinforced Frame, Prospector 1, Vanguard 3, +1 HULL, Impaler Nailgun (Supermassive Mod), EVA Module, Armament Redundancy
Lose: Prospector 3, Missile Racks x2, Type-3 Projected Shield
-- GMS Chomolungma @ LL6 --
[ LICENSES ]
  HORUS Goblin 1, IPS-N Vlad 2, HA Sunzi 1, IPS-N Drake 1, IPS-N Caliban 1
[ CORE BONUSES ]
  Overpower Caliber, Reinforced Frame
[ TALENTS ]
  Vanguard 3, Walking Armory 2, Empath 2, Prospector 1, Drone Commander 1
[ STATS ]
  HULL:4 AGI:0 SYS:2 ENGI:2
  STRUCTURE:4 HP:28 ARMOR:0
  STRESS:4 HEATCAP:8 REPAIR:6
  TECH ATK:+3 LIMITED:+1
  SPD:4 EVA:8 EDEF:12 SENSE:15 SAVE:14
[ WEAPONS ]
  MAIN/AUX MOUNT: Assault Cannon / Nexus (Light) // Overpower Caliber
  FLEX MOUNT: Impaler Nailgun (Supermassive Mod)
[ SYSTEMS ]
  Personalizations, H0R_OS System Upgrade I, Blink Charges x4, Turret Drones x4, EVA Module, Armament Redundancy
Reinforced Frame - 5 HP per structure is quite a significant jump in survivability that can’t be turned off by Shredded, like Armor can. You can think of this as equivalent to 2.5 Hull points. With this in combination with our Replacable Parts trait, it will be noticeably difficult to take down this mech over the course of a few scenes.
Impaler Nailgun (Supermassive Mod) - In combination with our new talent, Vanguard 3, we now threaten an Accurate Overwatch attack that can Immobilize on hit against enemies that get close (Range 3) to us. With Jager Rounds from Walking Armory 2, this Overwatch knocks back 3 spaces, and can potentially Prone the target. Your off-turn pressure with this build becomes very strong from this point forward. If a melee enemy fails both saves on this Overwatch, they effectively lose 2 activations.
Vanguard 3 - We give up Prospector 3 for this (keeping Prospector 1), but it’s well worth the threat of a Nailgun Overwatch when an enemy moves within 3 spaces of you.
Strategy
On top of the core build established at LL3, you now have highly impactful off-turn pressure in the form of Impaler Nailgun, amplified by the Supermassive Mod and Jager Rounds from Walking Armory 2. Keep in mind you have 7 charges of Ammo Case. Typically this means you’ll have 3 uses of Jager Rounds for your Impaler Nailgun for knockback and Prone, and 1 use of Mag Rounds for your Assault Cannon for Arcing. Even without Jager Rounds, a Supermassive Impaler Nailgun Overwatch can be very debilitating, so try to be judicious with when you use Jager Rounds if your Overwatch is getting triggered often.
Your on-turn actions and rollout options are the same as before, now amplified by one of the best off-turn threats in the game. In exchange for this, we only have Prospector 1 instead of Prospector 3 now, but that just means that it is almost entirely a rollout tool of roughly the same value.
LL7
Respec: None
Gain: HA Sherman 1, Drone Commander 2, +1 SYS, Accelerate
Lose: EVA Module
-- GMS Chomolungma @ LL7 --
[ LICENSES ]
  HORUS Goblin 1, IPS-N Vlad 2, HA Sunzi 1, IPS-N Drake 1, IPS-N Caliban 1, HA Sherman 1
[ CORE BONUSES ]
  Overpower Caliber, Reinforced Frame
[ TALENTS ]
  Vanguard 3, Walking Armory 2, Empath 2, Drone Commander 2, Prospector 1
[ STATS ]
  HULL:4 AGI:0 SYS:3 ENGI:2
  STRUCTURE:4 HP:29 ARMOR:0
  STRESS:4 HEATCAP:8 REPAIR:6
  TECH ATK:+4 LIMITED:+1
  SPD:4 EVA:8 EDEF:13 SENSE:15 SAVE:15
[ WEAPONS ]
  MAIN/AUX MOUNT: Assault Cannon / Nexus (Light) // Overpower Caliber
  FLEX MOUNT: Impaler Nailgun (Supermassive Mod)
[ SYSTEMS ]
  Personalizations, H0R_OS System Upgrade I, Blink Charges x4, Turret Drones x4, Armament Redundancy, Accelerate
Drone Commander 2 - We only keep this talent for this level, but you can trigger it easily using the free Lock On from your Brilliance trait. This is mostly here for respec purposes next level, though.
Accelerate - Quite useful on the first round of combat to move your team very far in combination with Prospector 1 and/or Warp Grenades. It even counts as a Quick Tech, which means you can use it with Brilliance to move your party extremely far. Warp Grenade, Overcharge for a second Warp Grenade, Brilliance for Accelerate, and Prospector 1 moves your team about 20-22 spaces in 1 turn.
LL8
Respec: Drone Commander 2 -> Grease Monkey 2
Gain: HA Sherman 2, Grease Monkey 3, +1 ENGI, Redundant Systems Upgrade
Lose: Turret Drones, Accelerate
-- GMS Chomolungma @ LL8 --
[ LICENSES ]
  HORUS Goblin 1, IPS-N Vlad 2, HA Sunzi 1, IPS-N Drake 1, IPS-N Caliban 1, HA Sherman 2
[ CORE BONUSES ]
  Overpower Caliber, Reinforced Frame
[ TALENTS ]
  Vanguard 3, Grease Monkey 3, Walking Armory 2, Empath 2, Prospector 1
[ STATS ]
  HULL:4 AGI:0 SYS:3 ENGI:3
  STRUCTURE:4 HP:29 ARMOR:0
  STRESS:4 HEATCAP:9 REPAIR:6
  TECH ATK:+4 LIMITED:+1
  SPD:4 EVA:8 EDEF:13 SENSE:15 SAVE:15
[ WEAPONS ]
  MAIN/AUX MOUNT: Assault Cannon / Nexus (Light) // Overpower Caliber
  FLEX MOUNT: Impaler Nailgun (Supermassive Mod)
[ SYSTEMS ]
  Personalizations, H0R_OS System Upgrade I, Blink Charges x4, Armament Redundancy, Redundant Systems Upgrade x2, EVA Module
Redundant Systems Upgrade - A very efficient defensive system, made even more efficient with Grease Monkey 2’s effect of removing several Conditions at once. Normally, using a Full Action to Stabilize is not good for tempo and affecting enemy activations, but RSU eliminates this problem. With Grease Monkey 3’s Supply Drop, you’ll get 3 uses of this in longer missions with a rest in between.
Grease Monkey 3 - Grease Monkey 2 makes your Stabilize actions more efficient, including those taken as a quick action from Redundant Systems Upgrade. Grease Monkey 3 gives you and your whole team a 1/mission Supply Drop that replenishes 1 Structure and 1 charge to all of your Limited Systems. The Structure is very useful and helps your team fight attrition very well, but the extra charges of Blink Charges, RSU as well as Ammo Case (from Walking Armory) for yourself are very welcome.
LL9
Respec: IPS-N Caliban 1 -> SSC Emperor 1
Gain: SSC Emperor 2, Superior By Design, Walking Armory 3, +1 ENGI, Shahnameh
Lose: EVA Module, Supermassive Mod
-- GMS Chomolungma @ LL9 --
[ LICENSES ]
  HORUS Goblin 1, IPS-N Vlad 2, HA Sunzi 1, IPS-N Drake 1, HA Sherman 2, SSC Emperor 2
[ CORE BONUSES ]
  Overpower Caliber, Reinforced Frame, Superior by Design
[ TALENTS ]
  Vanguard 3, Grease Monkey 3, Walking Armory 3, Empath 2, Prospector 1
[ STATS ]
  HULL:4 AGI:0 SYS:3 ENGI:4
  STRUCTURE:4 HP:30 ARMOR:0
  STRESS:4 HEATCAP:12 REPAIR:6
  TECH ATK:+4 LIMITED:+2
  SPD:4 EVA:8 EDEF:13 SENSE:15 SAVE:16
[ WEAPONS ]
  MAIN/AUX MOUNT: Assault Cannon / Nexus (Light) // Overpower Caliber
  FLEX MOUNT: Impaler Nailgun
[ SYSTEMS ]
  Personalizations, H0R_OS System Upgrade I, Blink Charges x5, Armament Redundancy, Redundant Systems Upgrade x3, Shahnameh x5
Superior By Design - Immunity to Impaired makes us much harder to shut or slow down, and makes Stressing much less scary. In many situations we can Overcharge knowing we’ll stress because the most likely outcome (getting Impaired) will be ignored.
Walking Armory 3 - Effectively gives us 30-47.6% more Walking Armory Charges on average, since that’s our crit chance at this level with 0 and 1 Accuracy respectively. Our Impaler Nailgun will typically shoot at +1 Accuracy, while our Assault Cannon will fire at 0 usually. Especially over the course of a few scenes, this can mean Jager Rounds is much more spammable on many of your attacks, especially Nailgun Overwatches. As we gain more levels and therefore more Grit and crit chance, this talent level continues to gain more value.
Strategy
Our two new tools are Shahnameh to support our allies and help them clear heat, and Redundant Systems Upgrade to keep ourselves alive. These two systems are limited, but we’ll get an extra use across multiple scenes thanks to Grease Monkey 3. With 4 points in Engineering and Grease Monkey 3, we can use Blink Charges and Shahnameh quite liberally.
We now have such a wide variety of options in our toolbox to fit many situations.
- Control - Invades (Eject Power Cores, Balance Control Lockout), Warp Grenades, Walking Armory + Impaler Nailgun/Assault Cannon, Wide Area Code Pulse
- Support - Shahnameh, Empath 2
- Movement - Warp Grenades, Prospector
- Damage - Overpower Caliber Assault Cannon, Brilliance Lock-On
- Survivability - Redundant Systems Unit with Grease Monkey 2, Reinforced Frame, Vanguard 3 Impaler Nailgun
LL10
Respec: None
Gain: IPS-N Nelson 1, Nuclear Cavalier 1, +1 SYS, Bulwark Mods
Lose: None
-- GMS Chomolungma @ LL10 --
[ LICENSES ]
  HORUS Goblin 1, IPS-N Vlad 2, HA Sunzi 1, IPS-N Drake 1, HA Sherman 2, SSC Emperor 2, IPS-N Nelson 1
[ CORE BONUSES ]
  Overpower Caliber, Reinforced Frame, Superior by Design
[ TALENTS ]
  Vanguard 3, Grease Monkey 3, Walking Armory 3, Empath 2, Prospector 1, Nuclear Cavalier 1
[ STATS ]
  HULL:4 AGI:0 SYS:4 ENGI:4
  STRUCTURE:4 HP:30 ARMOR:0
  STRESS:4 HEATCAP:12 REPAIR:6
  TECH ATK:+5 LIMITED:+2
  SPD:4 EVA:8 EDEF:14 SENSE:15 SAVE:16
[ WEAPONS ]
  MAIN/AUX MOUNT: Assault Cannon / Nexus (Light) // Overpower Caliber
  FLEX MOUNT: Impaler Nailgun
[ SYSTEMS ]
  Personalizations, H0R_OS System Upgrade I, Blink Charges x5, Armament Redundancy, Redundant Systems Upgrade x3, Shahnameh x5, Bulwark Mods
Nuclear Cavalier 1 - Stressing enemies isn’t a common goal or outcome for this build, but this talent might make that a slightly more likely thing to play around. We’re mostly here for Nuclear Cavalier 2 next level.
Bulwark Mods - Sometimes lets us ignore difficult terrain, which can be useful even though Prospector and Warp Grenades effectively ignore it anyway.
LL11
Respec: IPS-N Nelson 1 -> HA Saladin 1
Gain: HA Saladin 2, Nuclear Cavalier 2, +1 HULL, Flash Anchor, EVA Module Lose: Bulwark Mods
-- GMS Chomolungma @ LL11 --
[ LICENSES ]
  HORUS Goblin 1, IPS-N Vlad 2, HA Sunzi 1, IPS-N Drake 1, HA Sherman 2, HA Saladin 2, SSC Emperor 2
[ CORE BONUSES ]
  Overpower Caliber, Reinforced Frame, Superior by Design
[ TALENTS ]
  Vanguard 3, Grease Monkey 3, Walking Armory 3, Empath 2, Nuclear Cavalier 2, Prospector 1
[ STATS ]
  HULL:5 AGI:0 SYS:4 ENGI:4
  STRUCTURE:4 HP:33 ARMOR:0
  STRESS:4 HEATCAP:12 REPAIR:6
  TECH ATK:+5 LIMITED:+2
  SPD:4 EVA:8 EDEF:14 SENSE:15 SAVE:17
[ WEAPONS ]
  MAIN/AUX MOUNT: Assault Cannon / Nexus (Light) // Overpower Caliber
  FLEX MOUNT: Impaler Nailgun
[ SYSTEMS ]
  Personalizations, H0R_OS System Upgrade I, Blink Charges x5, Armament Redundancy, Redundant Systems Upgrade x3, Shahnameh x5, Flash Anchor, EVA Module
Nuclear Cavalier 2 - We’re not gunning for Danger Zone hard with this build, but when we make it there our Assault Cannon Skirmishes will be that much more threatening. Now that we have Flash Anchor, we’re more likely to end up in Danger Zone. When you find yourself in Danger Zone with a good opportunity to Skirmish, I would recommend using the Lock-On from Brilliance to secure some Accuracy for it. This additional damage will help our Skirmishes keep up in damage at these later levels with higher enemy HP scaling.
Flash Anchor - For 1 SP, we get a powerful but situational tool: the capacity to simply deny forced movement against us or our party within range 15 of us. It’s 1/round, and costs 2 heat, but we have the heat cap to afford it. Many NPC effects are simply negated by this system, and many of the movement/objective based sitreps can be saved.
LL12
Respec: None
Gain: HA Gilgamesh 1, Heatfall Coolant System, Nuclear Cavalier 3, +1 HULL, Emergency Repair Module
Lose: EVA Module
-- GMS Chomolungma @ LL12 --
[ LICENSES ]
  HORUS Goblin 1, IPS-N Vlad 2, HA Sunzi 1, IPS-N Drake 1, HA Sherman 2, HA Saladin 2, SSC Emperor 2, HA Gilgamesh 1
[ CORE BONUSES ]
  Overpower Caliber, Reinforced Frame, Superior by Design, Heatfall Coolant System
[ TALENTS ]
  Vanguard 3, Grease Monkey 3, Walking Armory 3, Nuclear Cavalier 3, Empath 2, Prospector 1
[ STATS ]
  HULL:6 AGI:0 SYS:4 ENGI:4
  STRUCTURE:4 HP:35 ARMOR:0
  STRESS:4 HEATCAP:12 REPAIR:7
  TECH ATK:+5 LIMITED:+2
  SPD:4 EVA:8 EDEF:14 SENSE:15 SAVE:17
[ WEAPONS ]
  Integrated: Fuel Rod Gun
  MAIN/AUX MOUNT: Assault Cannon / Nexus (Light) // Overpower Caliber
  FLEX MOUNT: Impaler Nailgun
[ SYSTEMS ]
  Personalizations, H0R_OS System Upgrade I, Blink Charges x5, Armament Redundancy, Redundant Systems Upgrade x3, Shahnameh x5, Flash Anchor, Emergency Repair Module x3
Heatfall Coolant System - With a cap of 1d6 Heat instead of 1d6+4 Heat on our Overcharges, combined with our 12 Heatcap and immunity to Impaired through Superior by Design, we can mostly Overcharge with impunity. Fuel Rod Gun and Redundant Systems Upgrade can help further manage our heat from this.
Nuclear Cavalier 3 - Since we already have Vanguard 3, we now have the option to Overwatch with the Fuel Rod Gun instead of our Impaler Nailgun to clear some heat.
Emergency Repair Module - While Bracing is a significant reduction in the actions we can take on our following turn, ERM makes this much more efficient. You still want to use this sparingly, and only do it when it would prevent structure and heal a lot of your HP.
Strategy
All of our new tools are passive or reactive. Nuclear Cavalier 2 boosts our damage passively, but Nuclear Cavalier 3 can be used to clear heat with Vanguard 3. Flash Anchor can deny forced movement against you or an ally as a reaction. Emergency Repair Module can save you from an otherwise lethal scenario by Bracing as a reaction. Normally, you don’t want to Brace at all, but Emergency Repair Module is efficient enough to make it worth the cost.
We continue to Support our team, and strategically apply Control or damage to enemies where appropriate, while moving ourselves and our team efficiently across the map.
Branching Path - Smite
At LL9, if your team is efficiently cleaning up their own kills, you have the option to start devoting build space to Smite, another powerful invade option. You sacrifice access to Shahnameh, and delay getting Flash Anchor for this. In certain groups, or if you just want to transition into a build that leans even more controller, this is a good time to expand your repertoire. You’ll get Hardpoint Reinforcements for resistance to the damage, and The Lesson of the Open Door to make it even harder to pass the Systems Save. You already have some other qualities you want on the build for Smite, namely Reinforced Frame for a bigger HP pool, and Redundant Systems Upgrade to help recover lost HP from Smiting.
LL9
Respec: IPS-N Caliban 1 -> HORUS Manticore 1 Gain: HORUS Manticore 2, The Lesson of The Open Door, Walking Armory 3, +1 ENGI, Smite, Assault Rifle Lose: Assault Cannon, EVA Module, Supermassive Mod
-- GMS Chomolungma @ LL9 --
[ LICENSES ]
  HORUS Goblin 1, IPS-N Vlad 2, HA Sunzi 1, HA Sherman 2, IPS-N Caliban 1, HORUS Manticore 2
[ CORE BONUSES ]
  Overpower Caliber, Reinforced Frame, The Lesson of the Open Door
[ TALENTS ]
  Vanguard 3, Grease Monkey 3, Walking Armory 3, Empath 2, Prospector 1
[ STATS ]
  HULL:4 AGI:0 SYS:3 ENGI:4
  STRUCTURE:4 HP:30 ARMOR:0
  STRESS:4 HEATCAP:10 REPAIR:6
  TECH ATK:+4 LIMITED:+2
  SPD:4 EVA:8 EDEF:13 SENSE:15 SAVE:18
[ WEAPONS ]
  MAIN/AUX MOUNT: Impaler Nailgun / Nexus (Light) // Overpower Caliber
  FLEX MOUNT: Assault Rifle
[ SYSTEMS ]
  Personalizations, H0R_OS System Upgrade I, Blink Charges x5, Armament Redundancy, Redundant Systems Upgrade x3, Smite
Smite - At significant cost, you acquire the most powerful invade option in the game, which Stuns the target on a failed Systems save and successful tech attack hit. Like Eject Power Cores, this is limited to once per scene per target. Between these two hacks though, you should have no problem shutting down most NPCs on the map for most of their lifespan.
LL10
Respec: Overpower Caliber -> Superior By Design Gain: IPS-N Caliban 2, Nuclear Cavalier 1, +1 SYS, Hardpoint Reinforcement
Lose: Armament Redundancy
-- GMS Chomolungma @ LL10 --
[ LICENSES ]
  HORUS Goblin 1, IPS-N Vlad 2, HA Sunzi 1, HA Sherman 2, IPS-N Caliban 2, HORUS Manticore 2
[ CORE BONUSES ]
  Reinforced Frame, Superior by Design, The Lesson of the Open Door
[ TALENTS ]
  Vanguard 3, Grease Monkey 3, Walking Armory 3, Empath 2, Prospector 1, Nuclear Cavalier 1
[ STATS ]
  HULL:4 AGI:0 SYS:4 ENGI:4
  STRUCTURE:4 HP:30 ARMOR:0
  STRESS:4 HEATCAP:12 REPAIR:6
  TECH ATK:+5 LIMITED:+2
  SPD:4 EVA:8 EDEF:14 SENSE:15 SAVE:18
[ WEAPONS ]
  MAIN/AUX MOUNT: Impaler Nailgun / Nexus (Light)
  FLEX MOUNT: Assault Rifle
[ SYSTEMS ]
  Personalizations, H0R_OS System Upgrade I, Blink Charges x5, Redundant Systems Upgrade x3, Smite, Hardpoint Reinforcement
Hardpoint Reinforcement - This halves the damage we take from Smite for 2 SP.
LL11
Respec: None
Gain: IPS-N Nelson 1, Nuclear Cavalier 2, +1 HULL, Bulwark Mods
Lose: None
-- GMS Chomolungma @ LL11 --
[ LICENSES ]
  HORUS Goblin 1, IPS-N Vlad 2, HA Sunzi 1, HA Sherman 2, HORUS Manticore 2, IPS-N Caliban 2, IPS-N Nelson 1
[ CORE BONUSES ]
  Reinforced Frame, Superior by Design, The Lesson of the Open Door
[ TALENTS ]
  Vanguard 3, Grease Monkey 3, Walking Armory 3, Empath 2, Nuclear Cavalier 2, Prospector 1
[ STATS ]
  HULL:5 AGI:0 SYS:4 ENGI:4
  STRUCTURE:4 HP:33 ARMOR:0
  STRESS:4 HEATCAP:12 REPAIR:6
  TECH ATK:+5 LIMITED:+2
  SPD:4 EVA:8 EDEF:14 SENSE:15 SAVE:19
[ WEAPONS ]
  MAIN/AUX MOUNT: Impaler Nailgun / Nexus (Light)
  FLEX MOUNT: Assault Rifle
[ SYSTEMS ]
  Personalizations, H0R_OS System Upgrade I, Blink Charges x5, Redundant Systems Upgrade x3, Smite, Hardpoint Reinforcement, Bulwark Mods
LL12
Respec: IPS-N Nelson 1 -> HA Saladin 1
Gain: HA Saladin 2, Universal Compatibility, Nuclear Cavalier 3, +1 HULL, Flash Anchor
Lose: Bulwark Mods
-- GMS Chomolungma @ LL12 --
[ LICENSES ]
  HORUS Goblin 1, IPS-N Vlad 2, HA Sunzi 1, HA Sherman 2, HA Saladin 2, IPS-N Caliban 2, HORUS Manticore 2
[ CORE BONUSES ]
  Reinforced Frame, Superior by Design, The Lesson of the Open Door, Universal Compatibility
[ TALENTS ]
  Vanguard 3, Grease Monkey 3, Walking Armory 3, Nuclear Cavalier 3, Empath 2, Prospector 1
[ STATS ]
  HULL:6 AGI:0 SYS:4 ENGI:4
  STRUCTURE:4 HP:35 ARMOR:0
  STRESS:4 HEATCAP:12 REPAIR:7
  TECH ATK:+5 LIMITED:+2
  SPD:4 EVA:8 EDEF:14 SENSE:15 SAVE:19
[ WEAPONS ]
  Integrated: Fuel Rod Gun
  MAIN/AUX MOUNT: Impaler Nailgun / Nexus (Light)
  FLEX MOUNT: Assault Rifle
[ SYSTEMS ]
  Personalizations, H0R_OS System Upgrade I, Blink Charges x5, Redundant Systems Upgrade x3, Smite, Hardpoint Reinforcement, Flash Anchor
Strategy
This build trades the Support and Damage functionality of the primary path to fixate strongly on Control. Starting at LL10, we have everything we could want to make Smite work: bulk from Reinforced Frame and Hardpoint Reinforcement, survivability and HP gain from Redundant Systems Unit, and high Save Target from The Lesson of the Open Door. We’ve given up on Overpower Caliber to better support Smite as a central option on-turn, and with it Damage is realistically no longer a central function of this build. This also means that you realistically do not have many ways to deal with high E-Defense enemies, and will have to rely on your allies for that. Just like the main build path, we still have Flash Anchor to help our allies, as well as Nuclear Cavalier 3 to clear heat as a reaction with Vanguard 3. Universal Compatibility will help our Wide Area Code Pulse out by healing any HP lost from Smite and clearing heat at the same time.
You’ll still be supporting your team and controlling with Blink Charges and Prospector, but you’re more often going to Full Tech for 2 invades with this Smite build. You will often have Smite or Eject Power Cores available for some enemies in range, and your damage isn’t going to be particularly impactful, making Full Tech much more appealing.
Conclusion
The Chomolungma has shown to be a powerful hybrid at all points in progression, with the capacity to specialize into Damage, Support, Movement, or even more Control on top of its base Control kit. This particular build aims to give the player a toolbox of options to select from to handle practically any situation thrown at it, with the survivability to deal with unexpected outcomes. The variant builds taking Smite at LL9 specializes more into control, giving up some other options in the toolbox, but still has many tools to choose from. While the Chomolungma can be built many powerful ways, I find this general use build path to perform very well across a wide variety of difficult missions.
If you have further questions about this build, feel free to ping me on Hearth-7 and I’ll be happy to answer you!